Continuing to Teach When the LMS Is Unavailable
We know that outages of the campus learning management system (LMS) can significantly impact teaching and learning for you and your students, and we appreciate your patience during these disruptions. When the LMS is unavailable, teaching and learning can continue using alternative tools and strategies. This page provides guidance and practical resources to help instructors continue their courses during an LMS disruption. Whether the outage is brief or extended, these resources are designed to support clear communication, continuity of instruction, and care for students.
Communicate with Your Students
Communicate with your students as soon as possible through alternative methods, such as university email or other approved communication platforms.
Get Your Class Roster
The Class List page lets you view your class roster(s). It also includes links to the Course Details card, Class Details card, buttons in the top right to Export or Print, and an email option.
Important: We do not recommend using a mobile device to access Class Lists/Rosters as the delivered product has reduced functionality for viewing and emailing students.
Follow the steps below to access the Class List page:
Go to the Class List
Go to Class List.
Sort and Filter Courses
By default, a list of all courses ever assigned will display under the title CRN Listing. Clicking on any column header will sort the list ascending or descending depending on the number of times you click the header label.
- To view only courses taught in a specific term, click on the All Terms menu and choose the desired term from the dropdown menu.
Retrieve the Class List
To retrieve the Class List (roster) for a specific course, click in a blank space on that course row.
- If you click on a linked item (Course Title or CRN), it will open general course details or section-specific details for the CRN.
Select Students in Summary View
- Be sure you are on the Summary View.
- Click on the checkbox in the top row of the list next to Student Name. If you are using a cellphone this box will be missing which is why we recommend using a device with a larger screen.
Compose Email
Click on the blue envelope icon in the top right corner of the list, below the Summary View menu. This will create a new email message using the default email client installed and configured on your device. The student email addresses will populate in the Bcc line.
Troubleshooting & Limitations
- Please make sure your internet browser allows pop-ups from https://apps.uillinois.edu.
- If you have a class size larger than 100, this function will generate several emails into sets of 100 to avoid mail server issues that may have restrictions on the number of individuals to which you can email at one time.
- If you need any assistance with installing or configuring an email application on your device, please contact your unit’s desktop support.
Using Email+ via Webtools
If you have large courses, there are constraints on the effectiveness of just using your university email. Using the Email+ from Webtools alleviates those constraints. To learn more about using Email+, visit this webpage from the Office for Strategic Communications & Marketing.
Use Zoom
Illinois.zoom.us will still work! Even meetings that were scheduled through Canvas will continue to function. These session links can be shared directly with students via email.
Share Course Materials with Your Students
If possible, use locally-stored copies of your course materials, syllabi, assignments, and grade records that may exist on your computer, departmental drives, Box, OneDrive, or other approved storage locations.
Create Folder and Share
Here is a three-step process for creating a folder and securely sharing materials with your students using Illinois Box. This method restricts access to only those with a Illinois Box account.
Create the Course Materials Folder in Illinois Box
- Access your Illinois Box account by visiting https://uofi.app.box.com/ and signing in with your Net ID and password.
- Create a new folder dedicated to your course materials.
Generate a U of I-Restricted Share Link
- Select the folder and enable Shared Link.
- Set the sharing type to People in your Company. This ensures access is restricted to people from Illinois. Note that anyone from Illinois who has the link will be able to view the content of the folder.
- For the link settings, select View and Download rights so students can save the materials.
- Alternatively you can share the folder or file with students via their individual email addresses. You will need to type their addresses into the field of the Share dialog box and invite as Viewer.
Distribute the Link to Students
- Copy the generated shared link.
- Communicate this link to your students, such as by sending it to your Class List.
Submitting Assignments and Proctor Exams
We have a lot of tools at our disposal to collect assignments and to proctor exams! Using Box to Collect Assignments can be a very easy process. Illinois Media Space is a great option to have students present any presentations or final projects. And of course, Zoom is a low-effort option to proctor any exams you have.
Using Box to Collect Assignments
Use the following steps to create an upload-only folder in Box for collecting any assignments:
Locate the Folder
- Log in to your Box account.
- Select an existing folder or create a new one where you want the uploaded files to go.
Enable File Request
- Hover over the folder, click the More Options ellipsis (...) or right-click the folder.
- Select File Request from the menu.
- In the File Request window, click the toggle to Enable the link (if not already on).
Configure Security Settings
Click Settings. We recommend turning both of the following settings on so it is not an open upload link for everyone: the Edit is to customized the required fields, the Settings button is for the pop-up with two toggles). We recommend turning both of the following settings on so it is not an open upload link for everyone:
- Require uploaders to log in to Box: Toggle this on. If you do not either require an email or turn this toggle on, you will have no idea who uploaded the files and will be dependent upon file names. By using this choice, uploads will be securely tagged with the user's email address.
- Set a link expiration date: Toggle this on and select the specific date you want the upload link to automatically deactivate (e.g., a submission deadline).
Save and Share
- Click Save to apply the settings.
- (Optional) You can further customize the page by adding a title or instructions for your uploaders.
- Click Copy next to the generated URL and share it with your uploaders.
Using Illinois Media Space to Collect Projects and Presentations
Illinois Mediaspace offers several media upload and sharing options to consider when leveraging this system for video assignments.
- The Kaltura, Getting Started documentation offers an orientation to uploading and sharing.
- For resources on the various sharing, permissions and publishing routes so someone other than the media uploader can view a video:
- Documentation on Sharing Videos, Adding Collaborators, and Making a Video Public
- CITL provides a video Walkthrough of Mediaspace Sharing & Permissions
- If needing a Channel to organize media uploads from various submissions, see this article on Channel Creation and this one on adding a Roster for a Media Space channel
Zoom recordings into Mediaspace: Consider whether to leverage the automatic depositing of a Cloud Recording of a Zoom Meeting into the meeting host’s My Media of Mediaspace. More information is available in the article “Zoom, Recording to cloud or Illinois Media Space.”
Using Zoom to Proctor Your Exams
Zoom Settings
Sign into Illinois.zoom.us. Before scheduling the meeting, adjust these settings. The easiest way to find them is to use the search field.
| Setting | Action Required |
|---|---|
| Allow participants to rename themselves | Disabled |
| Enable Waiting Room | Enabled |
| Focus Mode | Enabled (Allow host to enable focus mode when scheduling: Enabled) |
| Virtual Background | Disable the virtual background or video filters |
| Recording | Cloud Recording: enabled Record gallery view with shared screen: enabled (Reference: ZoomSettings Image) |
Schedule the Meeting
Press the Meetings button in the left-hand navigation menu and then press the +Schedule a New Meeting button. The following options are recommended:
| Option | Action Required |
|---|---|
| Waiting Room | Enabled |
| Require authentication to join | Illinois email accounts |
| Allow participants to join anytime | Disabled (Press the Show button under Options to access this) |
| Mute participants upon entry | Enabled |
| Automatically record meeting | Enabled for In the cloud |
| Enable focus mode when meeting starts | Enabled |
| Alternative hosts | If you have any co-instructors or TAs, you can enter their names here. |
How Students Join
The passcode is embedded within the link that you get when scheduling the meeting, but you should share the meeting ID and passcode with your students so it is easy for them to join on a mobile device.
Students should join the meeting from a mobile device so that they can angle the camera at them sitting at their computer. They should try to make it so you can see them, their monitor and the top of their desk. You probably won’t be able to read their screen but should be able to see if they open anything on the computer not permitted or try to use other resources nearby.
Start the meeting. Before admitting students, the Waiting Room should still be enabled, and Focus Mode should already be on. Verify that the settings below are correct. (Spotlight is not an option until there are at least 2 other participants). Use the Zoom toolbar to access each panel below.
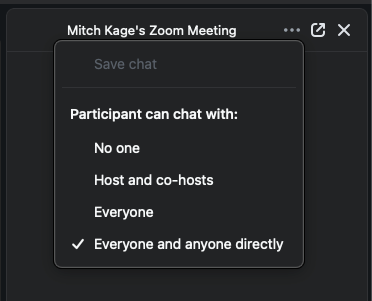
Press the Ellipsis button (3 dots) and choose “Participants can chat with hosts and co-hosts.”
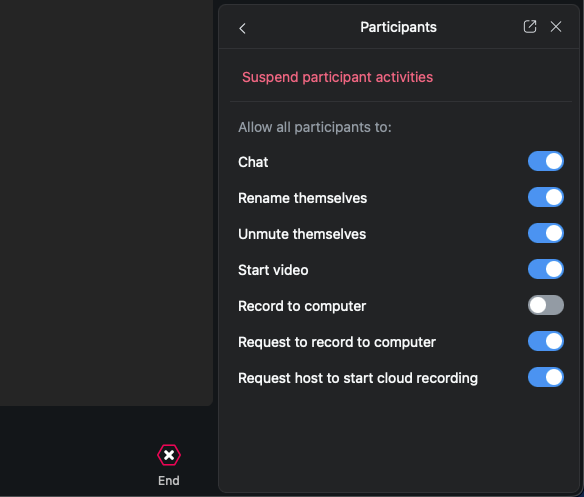
Press the Host Tools button to open a panel on the right and press Participants to view these options.
- Chat: enabled
- Start video: enabled
- All other options should be disabled.
- Press the back arrow to the left of the word Participants.
Press the Advanced button. If it’s not already on, press the switch to enable Focus Mode.
Press the Participants button in the toolbar and use the button to admit all participants. You could disable the waiting room, but we strongly recommend keeping it enabled for security.
We recommend viewing the participants in grid view with Gallery selected.

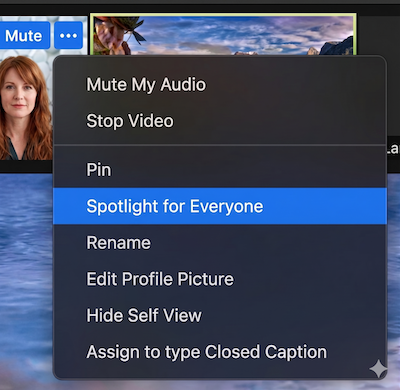
Make sure that your camera is not muted, and in your video tile, press the Ellipsis button to select Spotlight for Everyone. This way, students will only see you. (The Spotlight option is only available once you have 2 or more participants.
If you record to the Cloud, this means that the video is recorded both to the Zoom cloud account of the person who scheduled the meeting and is also copied to their mediaspace.illinois.edu account. You can sign into MediaSpace and review the recording later.
- Students use a mobile device with camera to show their workspace (camera is not pointed at face)
- Proctors can view the camera feed of up to 48 other participants simultaneously and can pin single user camera if needed
- Use private chat to communicate between the proctor & student. If audio is needed, use a breakout room for private conversations or to share screen.
Once Canvas Access has Been Restored
Once you can get back into Canvas, there are several considerations to take into account when you log into your course:
- Reconnect with Your Students on Campus: Communicate updated expectations and timelines clearly to students.
- Verify and Report Issues: Verify that gradebook entries, assignment submissions, and integrations are functioning as expected after restoration.
- Course Settings: Review course settings, assignment due dates, availability dates, and module requirements to ensure they still align with the adjusted course schedule.
- Deadlines and Timelines: Extend deadlines and reopen assignments or quizzes as appropriate to provide students adequate time to complete coursework.
Need further guidance?
CITL is here to help you think through your specific needs and find the solution that works best for you. Contact us for a consult.