Accessibility Tip of the Month 2024
2024 Accessibility Tip of the Month Articles
Each month, we share practical strategies and insights to help educators design more inclusive, accessible learning experiences. Tips are grounded in digital accessibility principles and provide actionable guidance on making your online course accessible. Explore the 2024 monthly tip articles below to discover new ways to support all learners!
Headings and Accessibility
Headings are automatically formatted to change the size of text, adding important context to sections of a page. When they are correctly selected, the Accessibility Checker in Canvas can detect when they are used and make recommendations to keep their hierarchy consistent.
Because heading levels are a type of semantic markup (HTML), they are especially helpful to students using assistive technology like screen readers. While sighted learners might skim a site by looking at different font sizes and their relationships on the page, blind and low vision students often use their screen reader to pull up a list of its headings that give them an idea of how the page content is organized. They can use that same heading list to quickly navigate to any section (heading) of the page's content.
Heading Levels in Canvas
Up to six levels of heading can be used in a Canvas page. A page's title is always formatted as Heading 1, and other levels can be selected from the formatting dropdown in the editor (see Figure 1). Heading 2 is used for all main sections of the page, Heading 3 is given to subtopics, and so on. The same selection of headings can be found under the Format menu, under Formats > Headings.
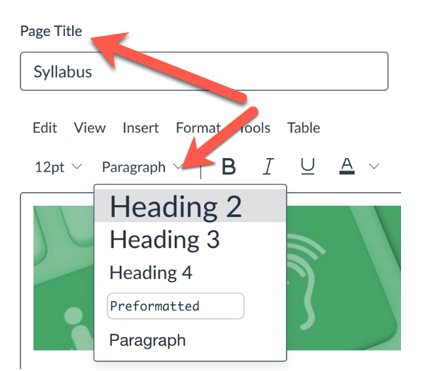
Figure 1: Canvas Editor Paragraph and Heading Options
Headings and the Accessibility Checker
Once a heading level is applied, you can change its font size or color if you don’t like the way it looks. You’re not bound by the default heading sizes or colors.

Figure 2: Accessibility Checker Heading Options
Heading levels are organized hierarchically, and just as in a topic outline, you would not move from a main section title (heading 2) to a sub-subsection title (heading 4) without first traversing a subsection title (heading 3). If you break the hierarchy of information and skip a heading level, the Canvas Accessibility Checker will flag this (see Figure 2). You will then be presented with three actions you can take: "Leave as is," "Fix heading hierarchy," or "Remove heading style."
If you're interested in enhancing the accessibility and inclusivity of your course, CITL's Universal Design for Learning (UDL) Team is here to help. For more information, contact us at CITL-UDLTeam@illinois.edu
When using colored text, it's important to choose colors that maintain a high contrast with the page's background. Users with low vision or particular types of colorblindness may have trouble differentiating between similar colors, so the Accessibility Checker in Canvas will flag colored elements with low contrast ratios.
When a low contrast ratio is detected, the Accessibility Checker will display a description of the issue, a box to input a new RGBa color code, and a selection panel and sliders to choose a new color visually:
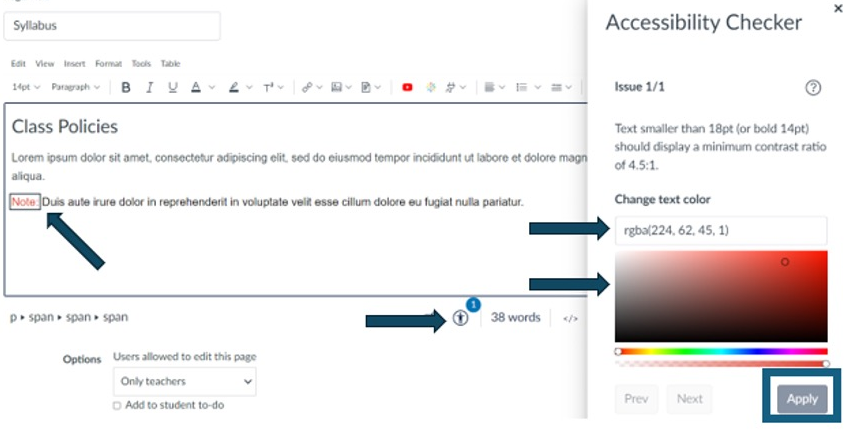
Once you've chosen a new color, click the Apply button to save the changes. The button will not be clickable if the new color is also at an unacceptable contrast ratio.
Resources:
Have you ever tried to decipher a complex table and felt like you needed a map? Some tables can be downright tricky to understand and navigate, but especially so for students using assistive technology. Can you imagine trying to follow along without the visual cues in the column and rows, for instance? This month’s Accessibility Tip focuses on how you can use the Canvas Accessibility Checker to make your tables in Canvas accessible and more understandable for all learners.
Table Captions, Headers, and Scope
The Canvas Accessibility Checker will flag missing table captions, headers, and scope. Here’s what you need to know about these important table features and how to fix them using the Canvas Accessibility Checker.
Table Captions
A table caption is essentially a concise title that describes what the table is about. This helps all learners grasp the purpose of the table at a glance.
Checker: If your table is missing a caption, the Accessibility Checker will prompt you with an “Add a Caption” field where you can type in the table caption (see Figure 1).
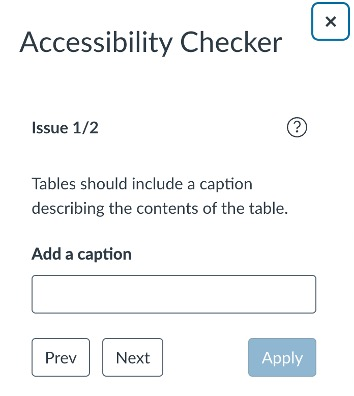
Figure 1: Accessibility Checker Table Caption Tool
Table Headers
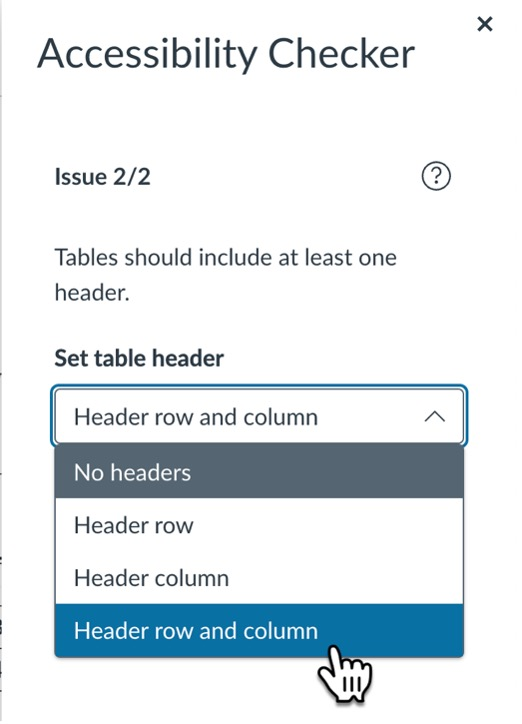
Think of table headers as the signposts in your table that provide a frame of reference that helps students understand what the data in each cell represents. In Canvas, you can designate headers for your rows and/or columns. Screen readers and other text-to-speech assistive technology can use these headers to provide context for the data in any data cell of the table.
Checker: If your table is missing headers, the Accessibility Checker will prompt you with a “Set Table Header” dropdown menu where you can add headers by selecting, “header row,” “header column,” or “header and column" (see Figure 2).
Scope
Scope defines the relationship between the header cells and the data cells. It’s what helps a screen reader user know if a header applies to a row or a column.
Checker: When you use the checker to add header rows or columns, the checker automatically sets the scope for your table. How’s that for easy!
Other Table Accessibility Issues
Complex Tables
While it’s tempting to create complex tables with merged cells to show more intricate data relationships, it’s better to avoid spanned cells if possible. In many cases, you can break up a complex table into two or more simple tables. A simple data table is one where each cell corresponds with only one column header and one row header.
Tables Used for Layout
Tables should be used for presenting tabular data. Using multi-column tables for page content layout and positioning can confuse screen readers and make your content harder to navigate. It can also introduce potential design issues for responsive layout where your layout might look different from what you intended on a tablet, mobile device, or different desktop screen resolutions. The good news is you can use the Canvas image tool to easily position images and text!
Stay tuned for next month’s tip, where we’ll explore how the Canvas accessibility checker can help you make your links and lists accessible! As always, if you need more assistance with making your course content accessible, CITL's Universal Design for Learning (UDL) Team is here to help. Contact us at CITL-UDLTeam@illinois.edu.
Links and Accessibility
Imagine you are looking through a list of links on a given webpage or document, trying to quickly access the information you need. Unfortunately, most of the links simply say, "click here," "here," or "this page." How will you know which link to click?
Learners trying to navigate with screen readers face this dilemma every day. Screen readers allow blind and low vision users to pull a list of links on the page. If your link text doesn’t make sense out of context, or if you’ve provided only raw URLs, your students will find it very difficult to navigate through the material. Accessible links allow users to quickly identify where a link will take them, and what the link's purpose is.
When building links in Canvas or in course documents, be sure to:
- Write descriptive link text that conveys the link's purpose.
- Visually differentiate links with underlining.
- Use WebAIM’s Link Contrast Checker to make sure the color contrast of the link text meets accessible color contrast guidelines.
Creating Accessible External Links in Canvas
- Write text that describes the link destination, such as the name of the article or website you’re linking to.
- Highlight the text.
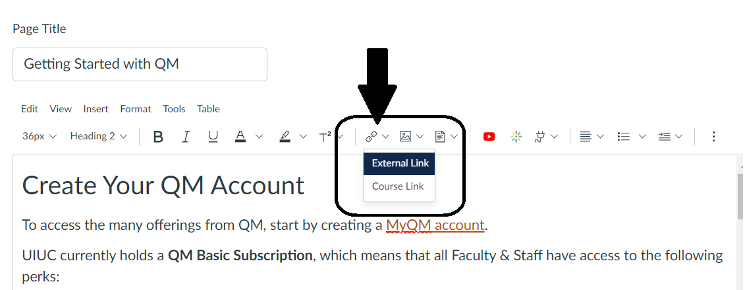
- Click the link icon in the middle of the Editor menu bar to open a drop-down menu (see Figure 1).
- Select External Link to open a link dialog box.
- Paste or type the URL for your hyperlink in the link field.
- Click Done in the bottom right corner of the dialog box.
Creating Accessible Links to Course Content in Canvas
- In the Canvas Editor, put your cursor where you want your link to appear on the page.
- Click the link icon in the middle of the Editor menu bar to open a drop-down menu.
- Select Course Link to open the Add window.
- Use the Search bar to search for your intended resource or use the dropdown menus beneath the search bar to locate the resource manually.
- Select the intended resource. A link with the same text as the content will appear in the Editor where you placed your cursor.
- Close the Add window by clicking the X in the top right corner.
- Select Save in the bottom right corner of the Rich Content Editor.
That’s it! You’ve created accessible links in Canvas. Happy linking! 😊
If you’re looking to enhance the accessibility and inclusivity of your course and teaching, CITL's Universal Design for Learning (UDL) Team can help. For more information, contact the UDL Team at CITL-UDLTeam@illinois.edu.
Resources
Lists and Accessibility
Lists help structure content and group related items. In order to create lists accessibly, they need to be created using the list formatting tools. Using hyphens, asterisks, or other non-semantic characters may create the appearance of a list, but lists created without formatting tools will not be recognized as lists by assistive technology.
Ordered vs. Unordered Lists
An ordered list organizes items in a specific sequence, usually marked with numbers, letters, or Roman numerals, and is used when the order of items matters, such as in step-by-step instructions or rankings. By contrast, an unordered list does not imply any particular order and typically uses bullet points to display items that are of equal importance or unrelated in sequence. A good example is recipe which typically uses an unordered (bulleted) list for the Ingredients and an ordered (numbered) list for the preparation Instructions.
Steps for Creating Fully Accessible Lists in Canvas
- Open the Rich Content Editor.
- Highlight the items you want to turn into a list.
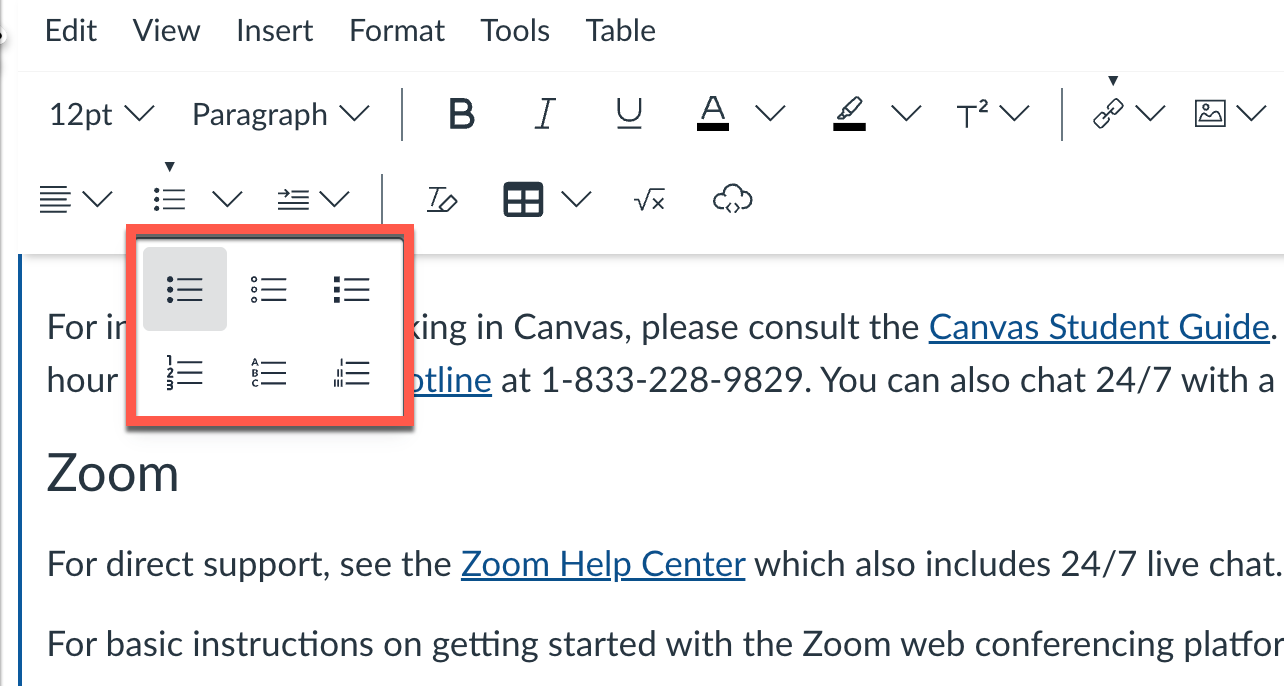
- Select the list icon* (looks like a bullet point list, three dots and three horizontal lines, stacked vertically).
- Choose your preferred list convention from the menu. The three options across the top are types of bullets for unordered lists; the bottom three options are types of numerals for ordered lists (see Figure 1).
- When finished editing, select Save in the bottom right corner of the Rich Content Editor.
*You may not be able to see the list icon if your browser window is too small. You can expand the editor menu by clicking on the overflow menu (three vertical dots in the upper right-hand corner of the editing menu).
Way to go! That’s all there is to it. Your lists are now accessible to all learners! 😊
Resources
- Canvas: Making Lists Accessible in Canvas
- University of Washington: Accessible Tech - Lists
- WebAIM: Lists
If you’re looking to enhance the accessibility and inclusivity of your course and teaching, CITL's Universal Design for Learning (UDL) Team can help. For more information, contact the UDL Team at CITL-UDLTeam@illinois.edu.