Accessibility Tip of the Month 2026
2026 Accessibility Tip of the Month Articles
Each month, we share practical strategies and insights to help educators design more inclusive, accessible learning experiences. Tips are grounded in digital accessibility principles and provide actionable guidance on making your online course accessible. Explore the 2026 monthly tip articles below to discover new ways to support all learners!
 Pope Tech Canvas Accessibility Guide Series: Using the Dismiss Feature
By Marc Thompson (CITL)
Have you ever run a Pope Tech accessibility scan in Canvas and seen an "error" or "alert" that you know isn't a problem? Maybe it’s a design choice the tool is flagging too cautiously, or a specific technical workaround. In the Pope Tech Canvas Guide, you can dismiss an error or alert result if you're certain it is not an accessibility issue. To be clear, if it is an accessibility issue, it should be addressed. You should not dismiss known accessibility issues. In this month's Accessibility Tip of the Month article, we'll look at how to dismiss results in the Pope Tech Accessibility Guide and Dashboard, as well as how to review and edit dismissed results. Before we dive into these topics, let's first take a step back to understand the basics of how the Dismiss feature works.
How the Dismiss Feature Works
- Who Can Dismiss? Course instructors and those with course editing privileges can dismiss results from the Accessibility Guide or Dashboard. Both Guide and Dashboard methods are explained in this article.
- What Types of Issues Can be Dismissed? Only Error and Alert type results can be dismissed.
- Do Dismissed Results Carry Over Across Courses? Dismissed results in a course are confined to that individual course and do not carry over across all of an instructor's courses.
- Do Copied Pages or Courses Include Dismissed Results? If you copy a page or course, the dismissed results will not apply to the copied content. The result(s) must be dismissed in the copied page or course.
- If using the Accessibility Guide, results are only dismissed on the individual page where they occur.
- If using the Dashboard with HTML matching option, you have an option to dismiss every instance of a specific issue in a course.
Dismissing Results in the Accessibility Guide
The Pope Tech Accessibility Guide allows you to selectively dismiss results while reviewing and fixing issues on individual Canvas pages. Any results dismissed using the Guide apply only to the page where they were dismissed.
To dismiss an Error or Alert result using the Accessibility Guide:
- Open the Accessibility Guide by going to the page you want to check, clicking Edit to open the Rich Content Editor, and then scrolling down to the bottom right of the page and clicking the Pope Tech Accessibility Guide icon located to the left of the Save icon (see Figure 1).

- When the Pope Tech Accessibility Guide is activated, the Accessibility Results panel appears (see Figure 2).
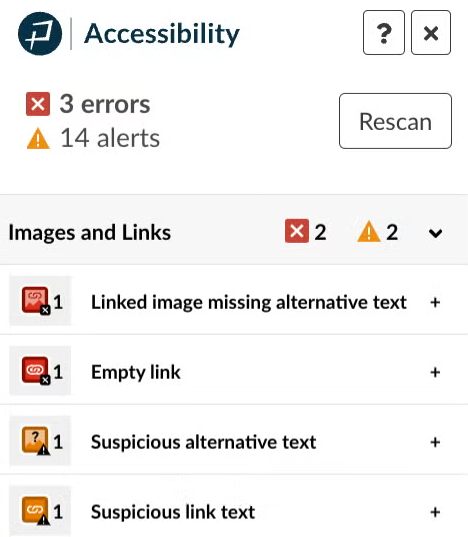
- In the Accessibility results panel, select the specific issue you wish to dismiss.
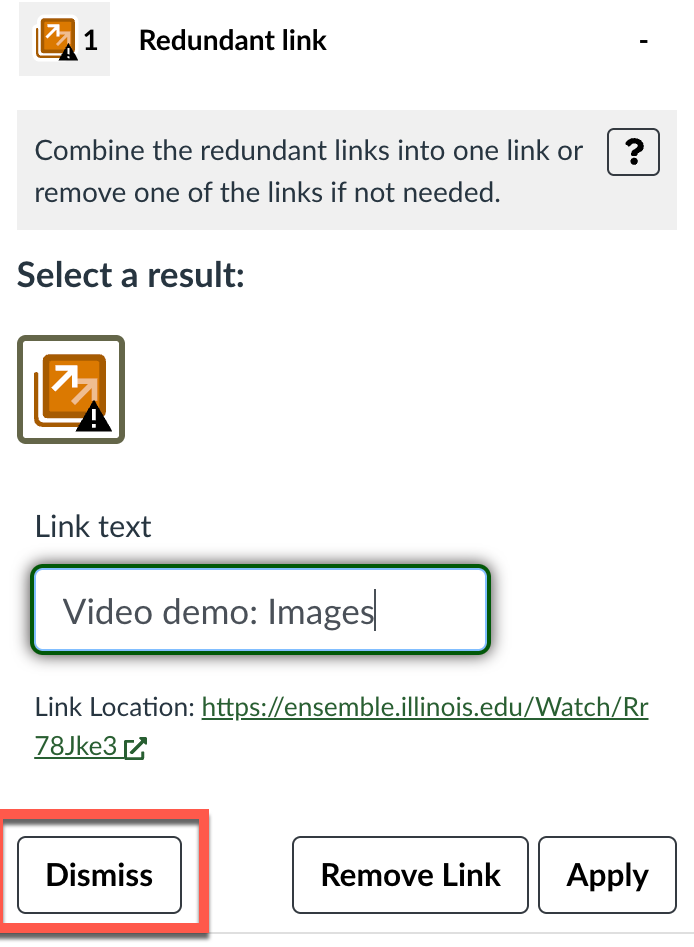
- Use the Dismiss button to dismiss the issue (see Figure 3).
- After clicking Dismiss, you will be prompted for a Reason for the Dismissal (see Figure 4).
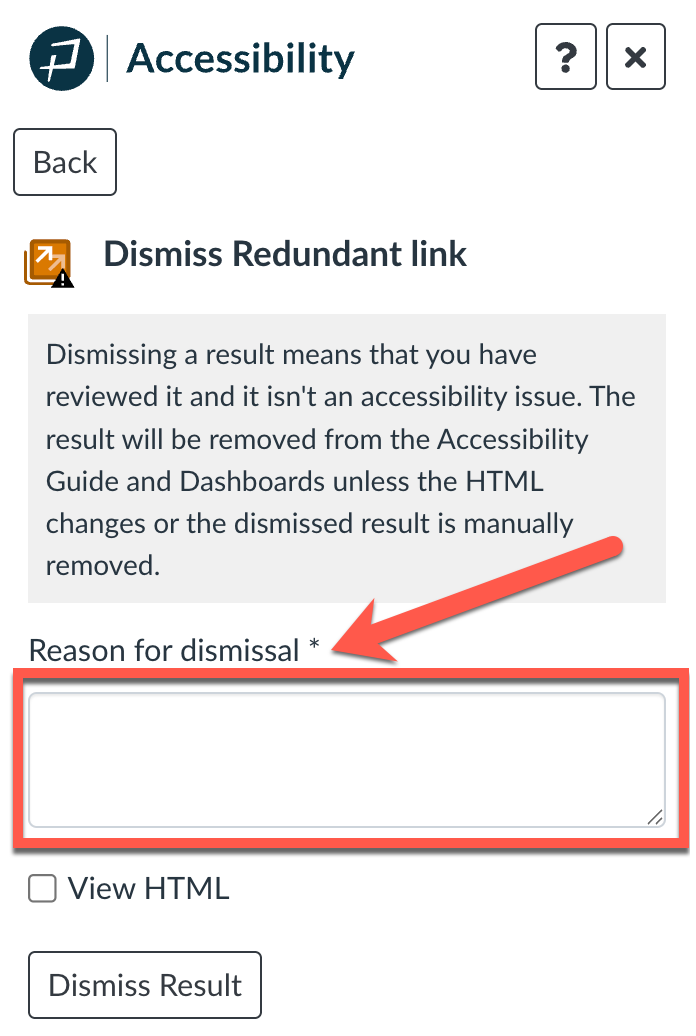
- Type the reason and click the Dismiss Result button.
The dismissed result is now removed from the Accessibility Guide, Dashboard, and reports.
Dismissing Results in the Dashboard
Dismissing results from the dashboard allows you to dismiss that result or all instances of that result in a specific course.
To dismiss results in the Dashboard:
- Drill down from the Dashboard to an accessibility result.
- Select the Code/Dismiss button (see Figure 5). The code view will open with the code line highlighted.

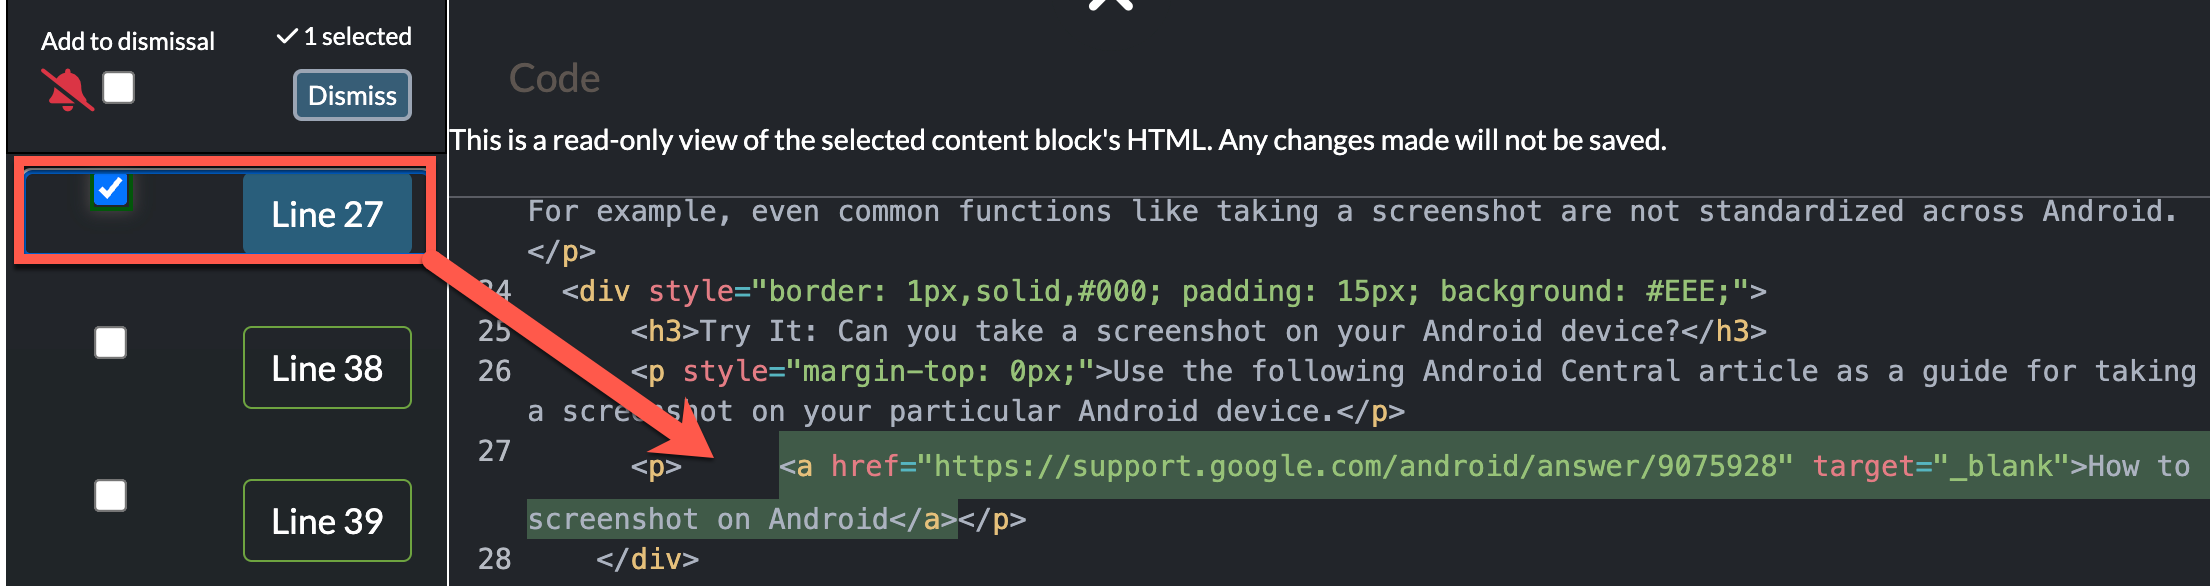
- Select the checkbox next to the code line and any related code lines you want to dismiss (see Figure 6).
- Select Dismiss.
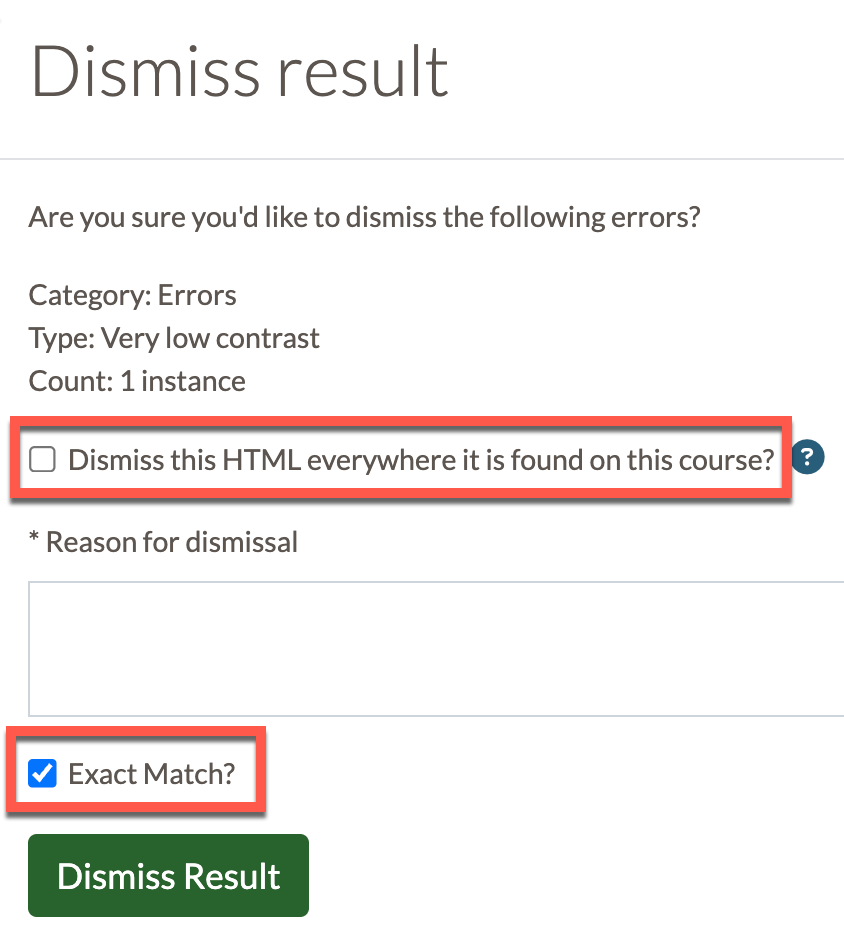
- Type a reason for the dismissal.
- If this same exact content is found throughout your course, select Dismiss this HTML everywhere it is found on this course? (see Figure 7). This dismisses the result anywhere the code is the exact same as this instance.
- If the HTML is slightly different, uncheck Exact Match? (see Figure 7) and change the HTML to what is the same for each instance you wish to dismiss.
- Select Dismiss Result.
The dismissed result is now removed from the Accessibility Guide, Dashboard, and reports.
Reviewing Dismissed Results
You can review all results you’ve dismissed from the Dashboard view. Follow these steps to review dismissed results:
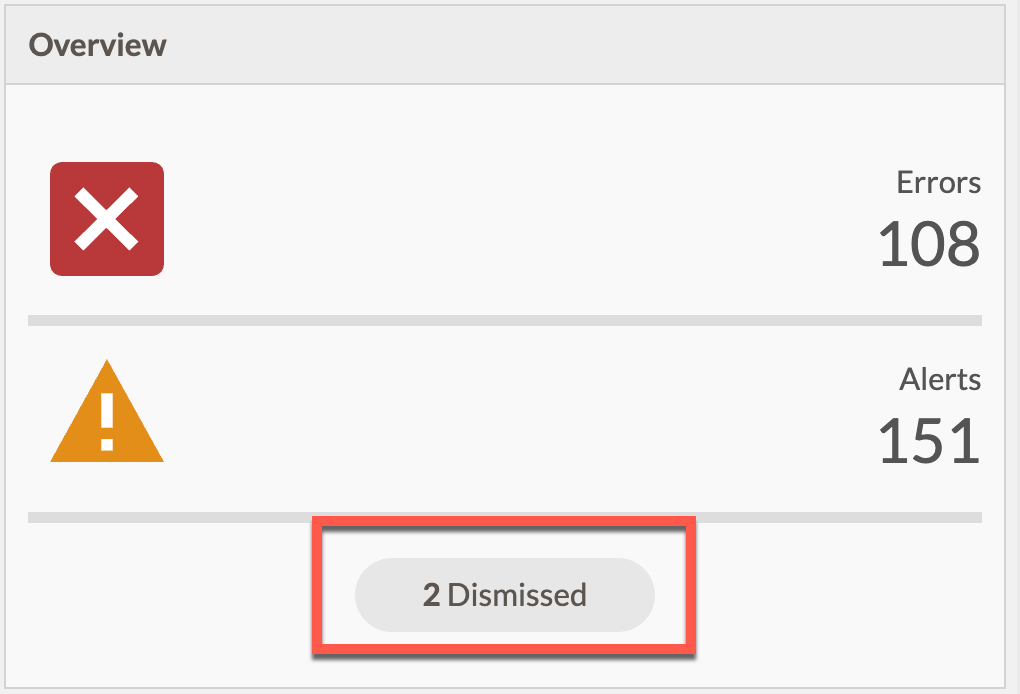
- From the Dashboard, go to the Results per course (if you’re on an Admin dashboard or My dashboard) or Overview (if you’re on a course dashboard) widget.
- Select the Dismissed button to go to Dismissed Results view (see Figure 8).
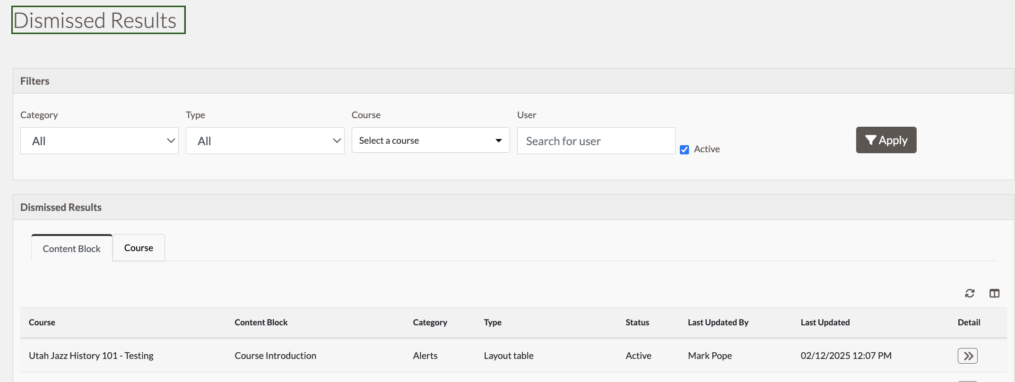
In Dismissed Results view, you can view all dismissed results, their course, content block, category (alert or error) type, and status here. You can also tell who dismissed each result and when. There are filters to sort by category, type, course, user, and status (see Figure 9).
Editing Dismissed Results
Updating a dismissed result to inactive or deleting the result adds it back to the Dashboard and reports.
- Inactive: Setting a dismissed result to inactive keeps the notes and log of who dismissed it.
- Deleting the dismissed result removes all associated notes.
Follow these steps to update a dismissed result’s status or delete it:
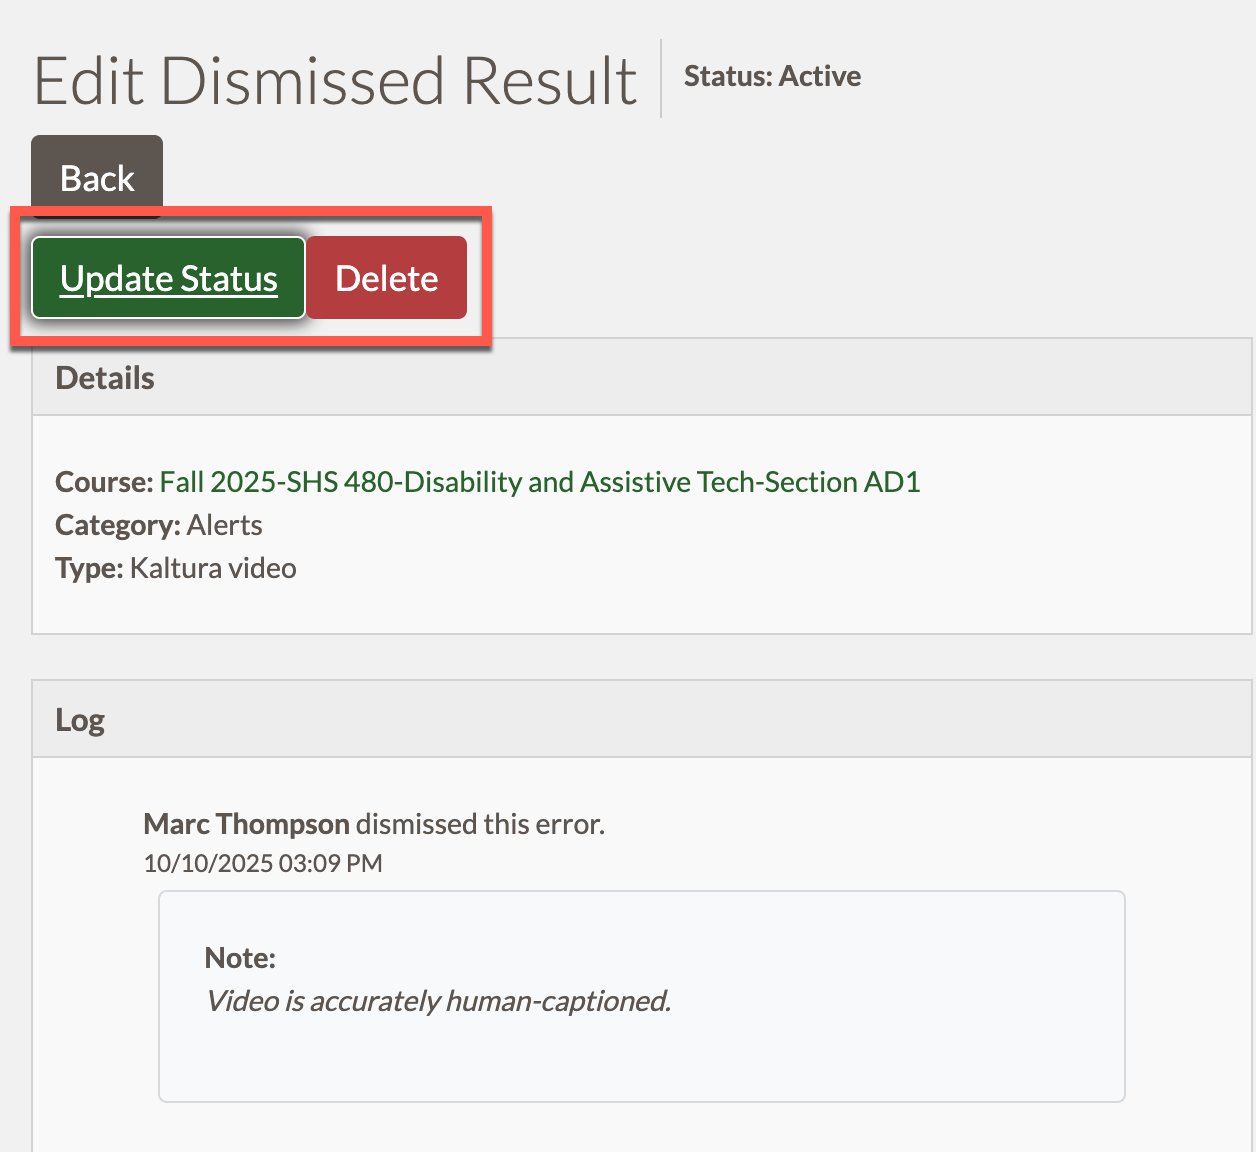
- From the Dismissed Results view, select the Detail button.
- On the Edit Dismissed Result view, select Update Status or Delete (see Figure 10).
Accessibility Tip of the Month:
Checking Color Contrast with
Pope Tech's Accessibility Guide
By Marc Thompson (CITL)
Emma, who has low vision, may struggle to read text that blends into the background. Josh, who is color-blind, might miss a crucial instruction if it’s conveyed only through a specific shade of red. Using strong color contrast isn’t just a design preference. It is a practical way to ensure everyone can read and understand your course content, regardless of visual ability or viewing conditions. Think of color contrast like a billboard on a highway: if the letters are light gray on a white background, you're likely to drive right past it without knowing what it said. To be accessible, our digital “billboards” need to pop!
This month, we’re highlighting how to use the Pope Tech Canvas Accessibility Guide to find and fix common color and contrast issues. In the Guide, these checks appear in the "Text and Contrast" category and are highlighted in your page content when you select each specific color contrast error listed in the Guide.
The Magic Numbers
The Pope Tech Guide checks your text color against its background and tells you whether it passes the AA conformance levels of the Web Content Accessibility Guidelines (WCAG 2.1). No math required!
- For most text, the minimum contrast ratio is 4.5:1.
- For large text (18pt or 14pt bold and larger), the minimum is 3:1.
Two Major Contrast Issues that Pope Tech Flags
1. Very Low Contrast (Error)
When Pope Tech detects low-contrast text, it highlights the content and provides a color picker to help you choose a passing color (see Figure 1). The Pope Tech Canvas Guide flags text that does not meet WCAG 2.1 AA contrast requirements for text and background color.
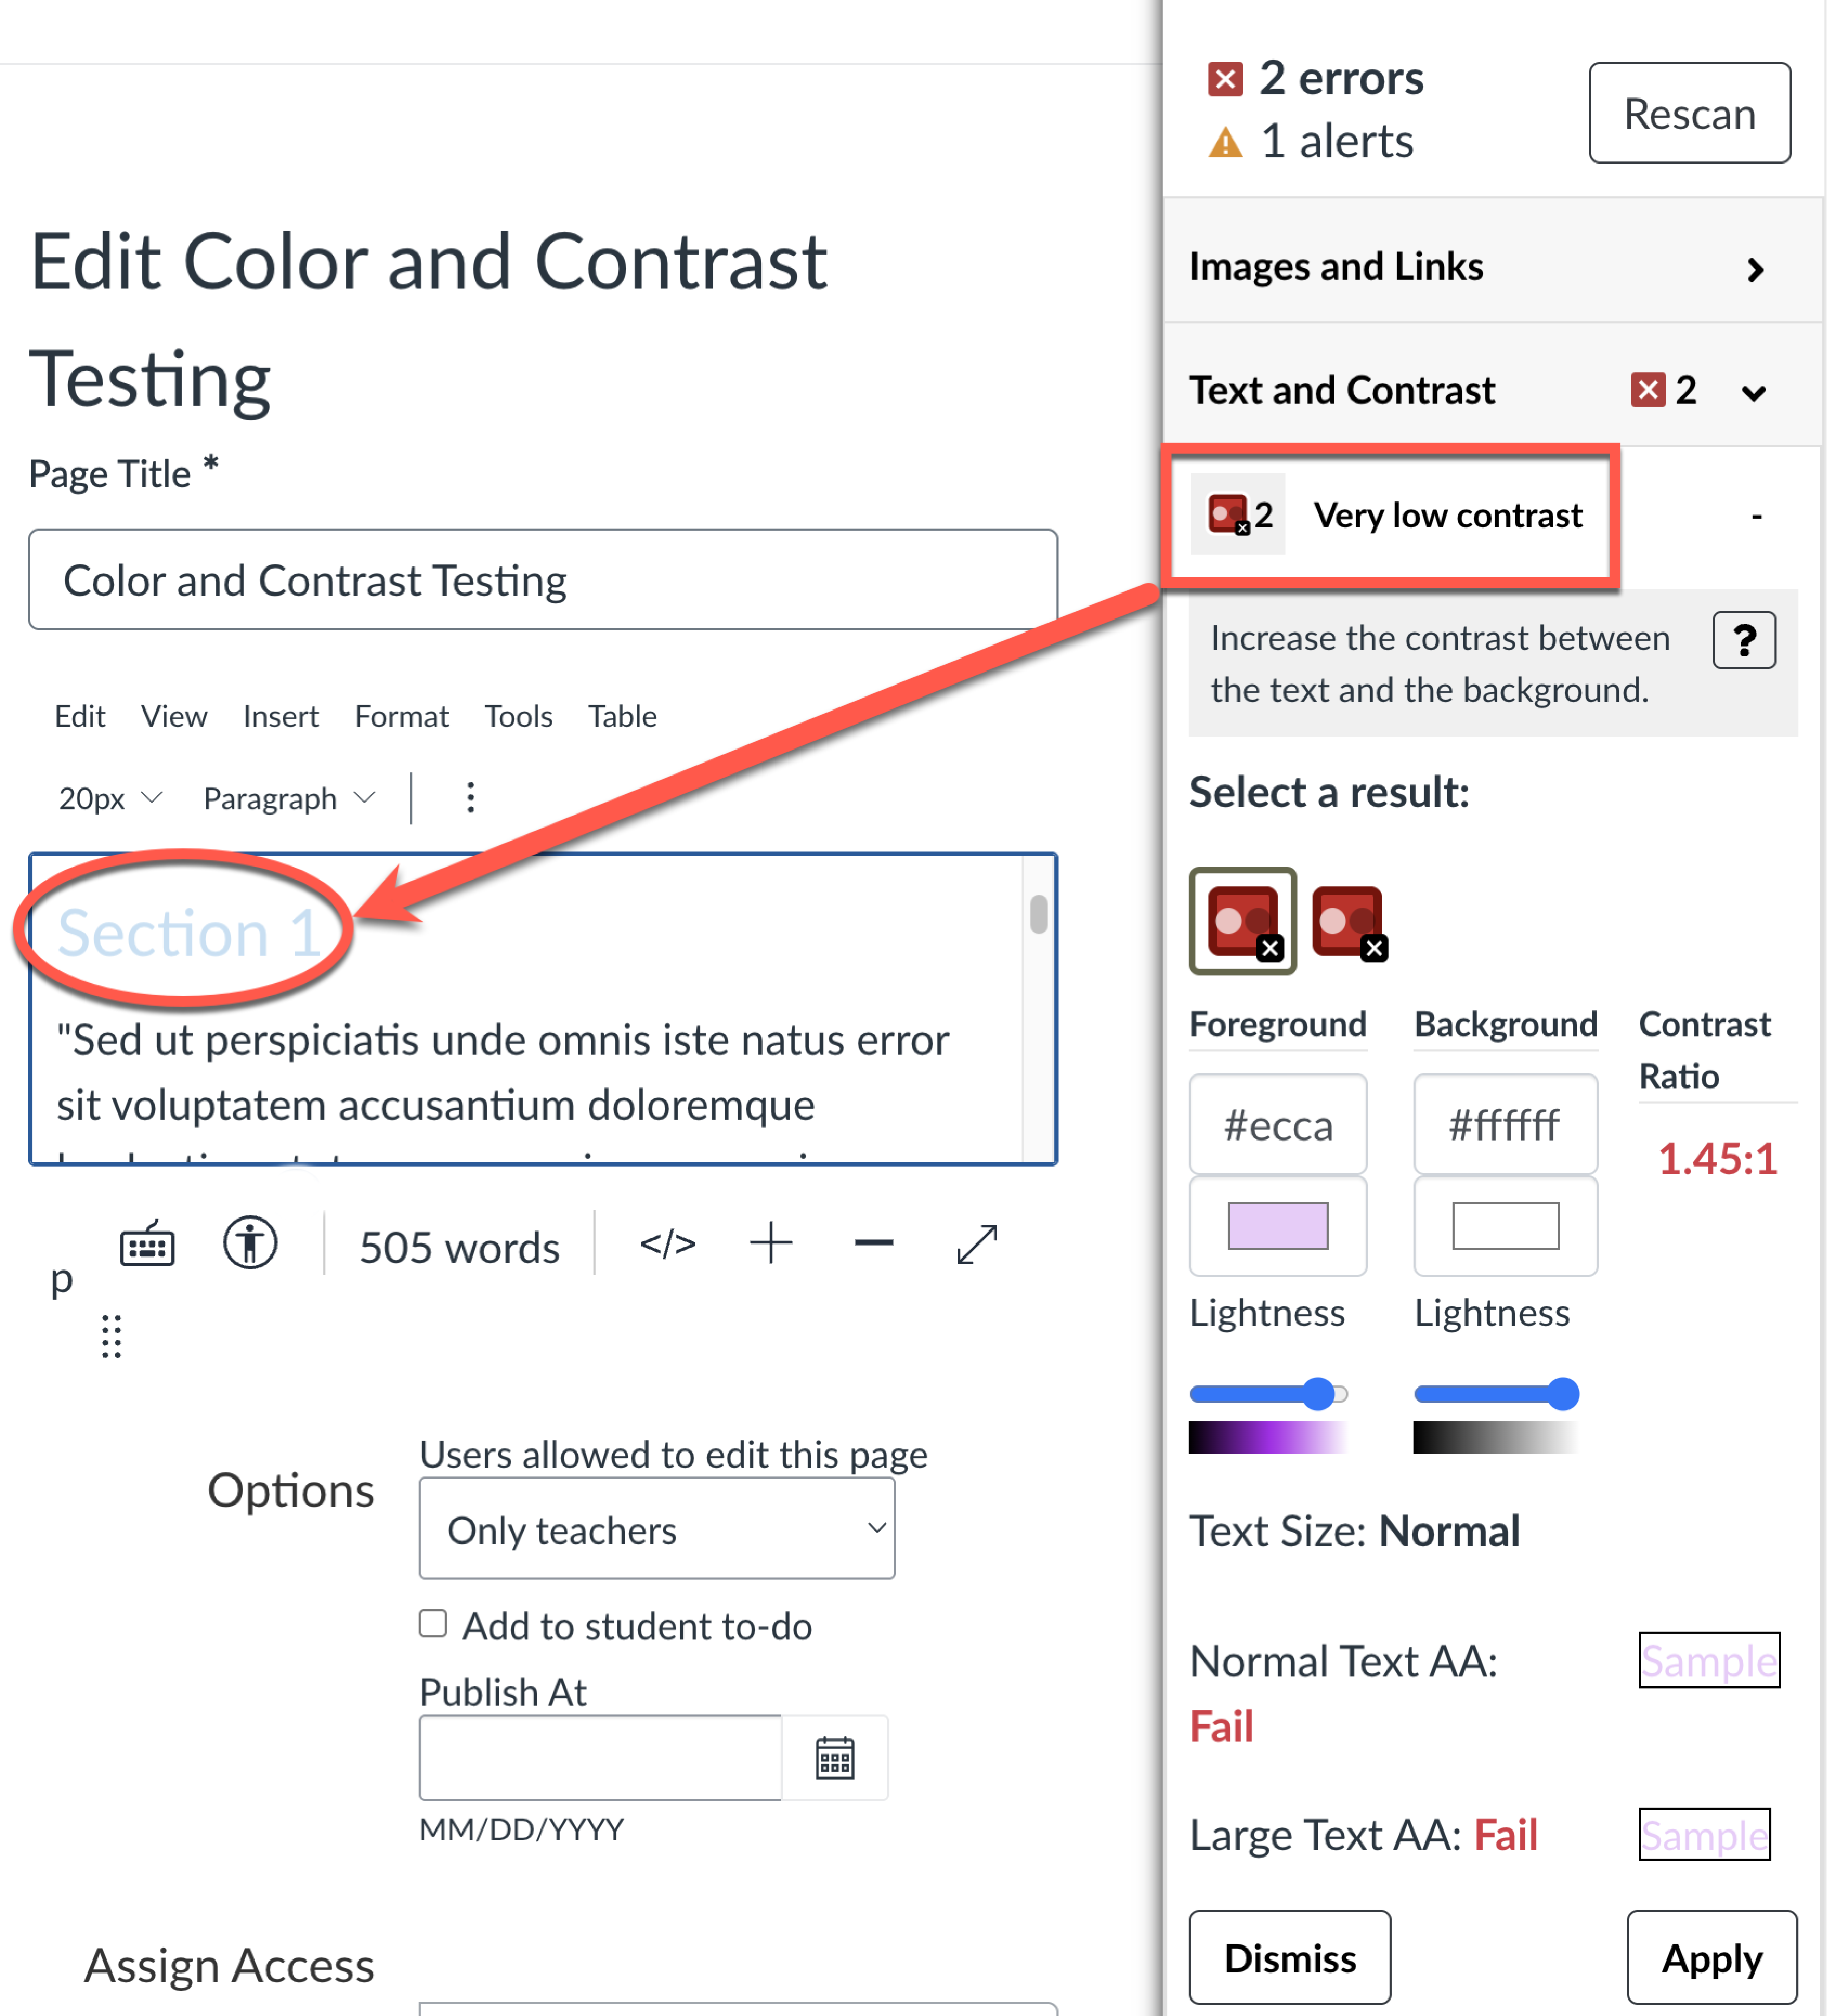
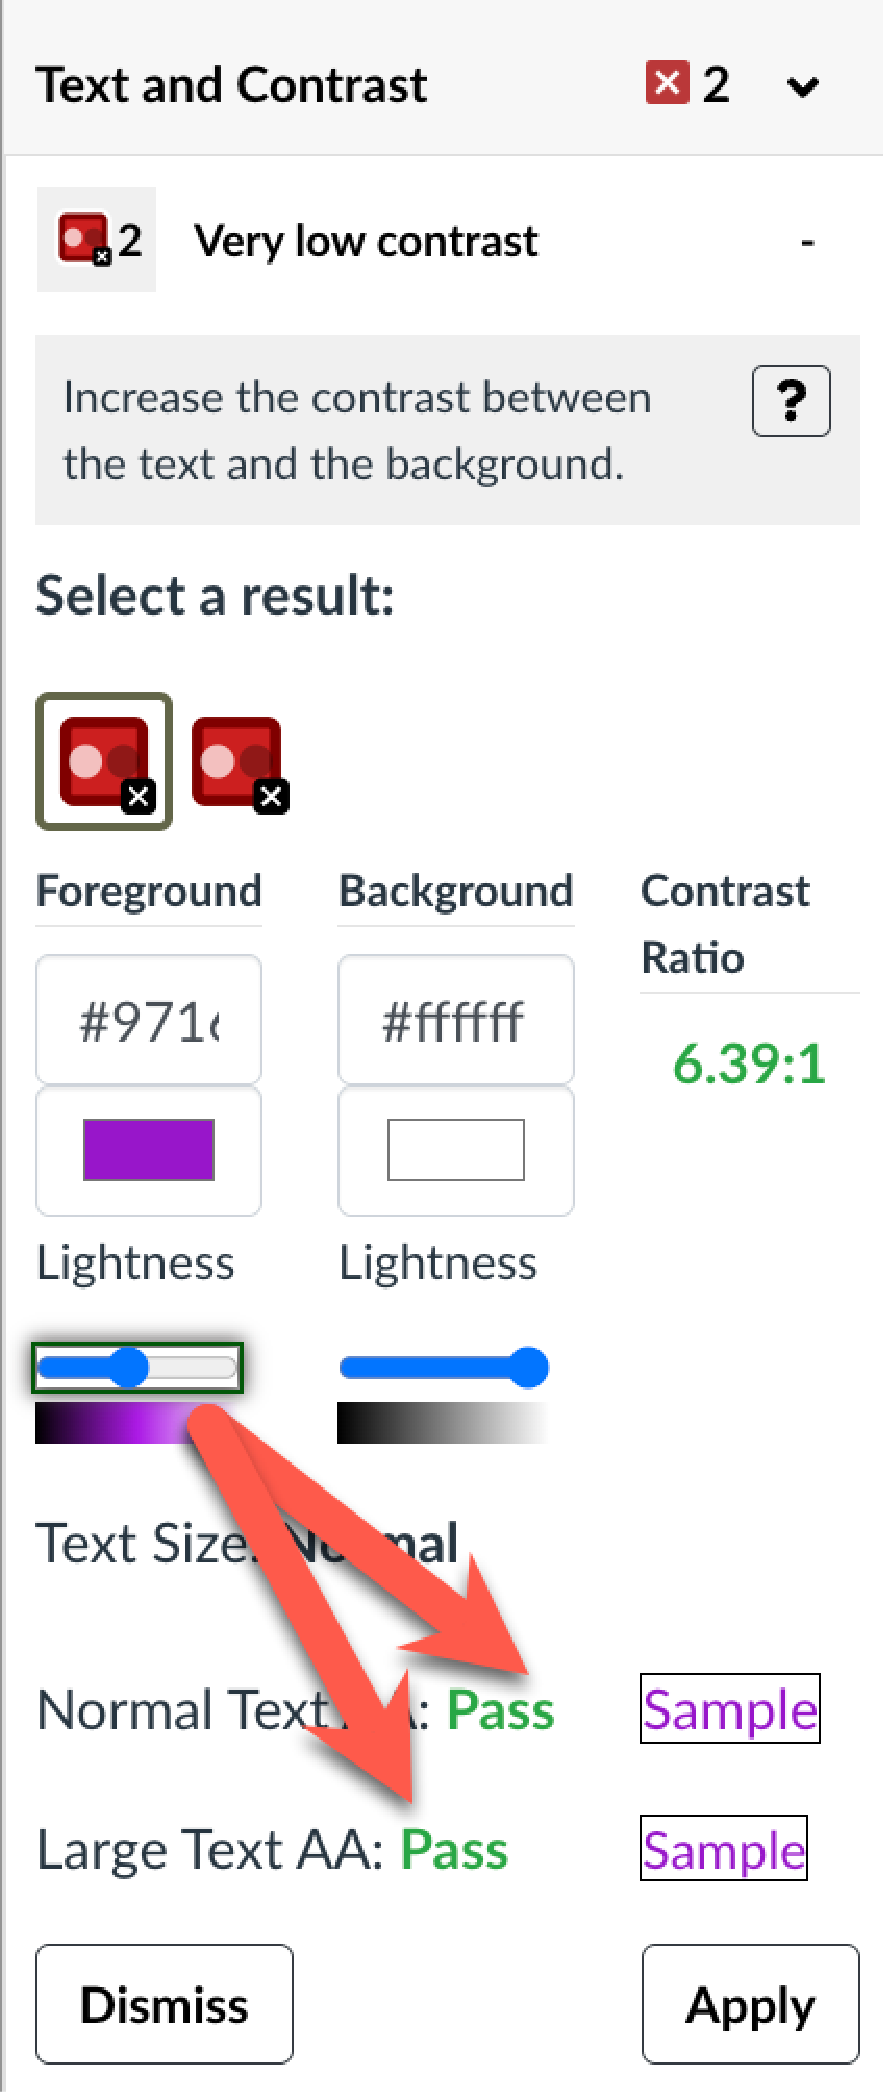
How to Fix: Use the sidebar color picker to lighten or darken the text until it passes (see Figure 2). As you adjust the color, the Guide immediately shows whether the new combination meets contrast requirements.
2. Non-Underlined Links (Alert)
Pope Tech flags links that rely on color alone to appear clickable.
How to Fix: Add an underline or ensure the link color has at least 3:1 contrast with surrounding text while still meeting 4.5:1 against the background.
Color Contrast Issues that Require Manual Checks
Use of Color Alone to Convey Meaning
Although "Do not rely on color alone to convey meaning" appears as an "Accessibility Tip" in the Text and Contrast category of the Guide, it does not check for this issue. A manual check involves looking for places where color is the only way information is communicated.
How to Fix:
- For reference points like “Items in red are required,” add a secondary cue such as an asterisk and/or a text label (e.g., “Required”).
- Where color alone is used to convey information in charts, pair color with labels, data values, patterns, or line styles (solid vs. dashed) so students can interpret the data even if they cannot perceive color differences.
Non-Text Contrast of Graphical Objects
The Pope Tech Canvas Guide cannot automatically flag contrast issues for informational graphical objects like chart bars, pie chart slices, line segments, or images of text (e.g., flyers or screenshots). Graphical objects should generally meet a 3:1 contrast ratio for adjacent colors. You can use a free color contrast tool like the Colour Contrast Analyser to check the color contrast ratio against WCAG guidelines, adjust the graphic at its source (e.g., PowerPoint, Excel, or image editor), and then re-upload.
How to Fix: Adjust colors used in the chart or graphic so adjacent elements are more visually distinct by darkening or lightening bars, lines, or segments. For example, if two pie chart slices appear as similar shades of blue, darken one slice or switch it to a different color so the slices are clearly distinguishable and meet a 3:1 contrast ratio for adjacent colors. For charts with legends, increase the contrast between legend items and their backgrounds.
Summary: Clarity Is Kindness
Whether students are viewing content on a phone in bright sunlight or late at night with tired eyes, effective use of sharp color contrast makes the reading experience more comfortable for everyone. Using the Pope Tech Canvas Accessibility Guide to address the "Text and Contrast" issues transforms a complex technical requirement into a manageable part of your course design workflow and helps ensure your content is legible across all devices, lighting conditions, and visual abilities.
Accessibility Tip of the Month:
Taming Your Tables with Pope Tech
By Marc Thompson (CITL)
Have you ever tried to decipher a complex table and felt like you needed a map? Some tables can be downright tricky to understand and navigate, but especially so for students using assistive technology. Screen readers, for example, can only move through tables one cell at a time. Imagine trying to follow along without the visual cues at the tops of the column or beginning of rows.
As we continue our mini-series on the Pope Tech Canvas Guide, let’s look at how this tool takes the manual labor out of making your tables accessible and understandable for all learners.
Why Use the Guide?
While you can author accessible tables in the Canvas Rich Content Editor, it often requires digging through nested property menus or manual coding. Pope Tech simplifies this by scanning your page and providing a clear, direct interface to fix issues without leaving your workflow.
Data Tables vs. Layout Tables
Before diving into the fixes, consider the table's purpose. Tables should strictly be used for data relationships. Avoid using tables for layout purposes to control where images or text sit on a page. Tables are rigid; they lack the flexibility to reflow, which destroys the intended spatial relationship between your content and forces mobile or low-vision users to scroll horizontally just to see "hidden" parts of your page.
Table Captions
A table caption is essentially a concise title that describes the table's contents. This helps all learners grasp the purpose of the data at a glance.
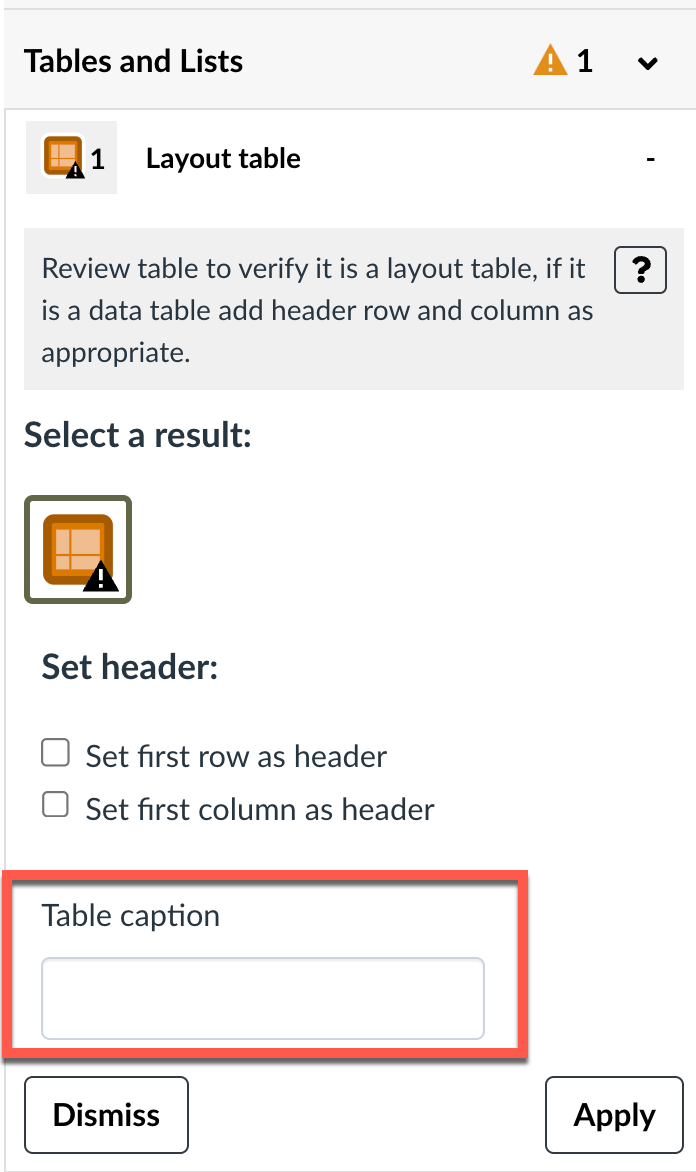
The Pope Tech Fix: If your table is missing a caption, the Guide will prompt you with an "Add a Caption" field where you can type the title directly into the sidebar to apply it.
Headers and Scope
Think of table headers as the signposts that provide a frame of reference for every data cell.
- Headers: These designate the top row or first column as the "label" for the data.
- Scope: This tells assistive technology if a header applies to the Row or the Column. Without scope, a screen reader may simply read a list of numbers without context.
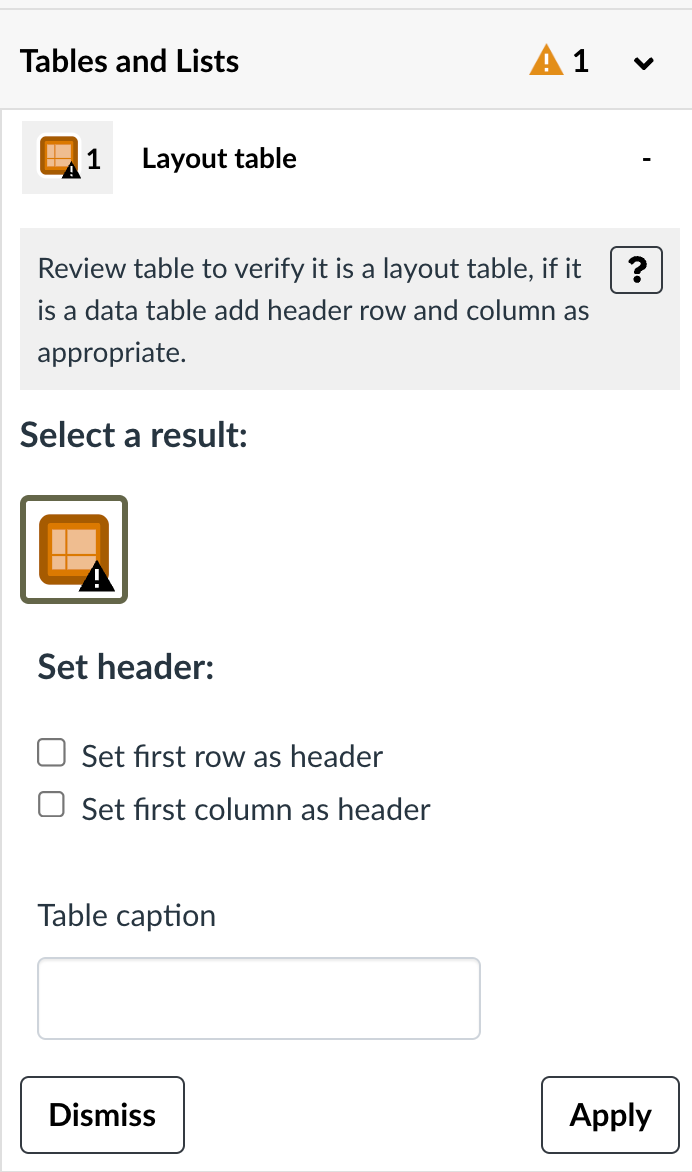
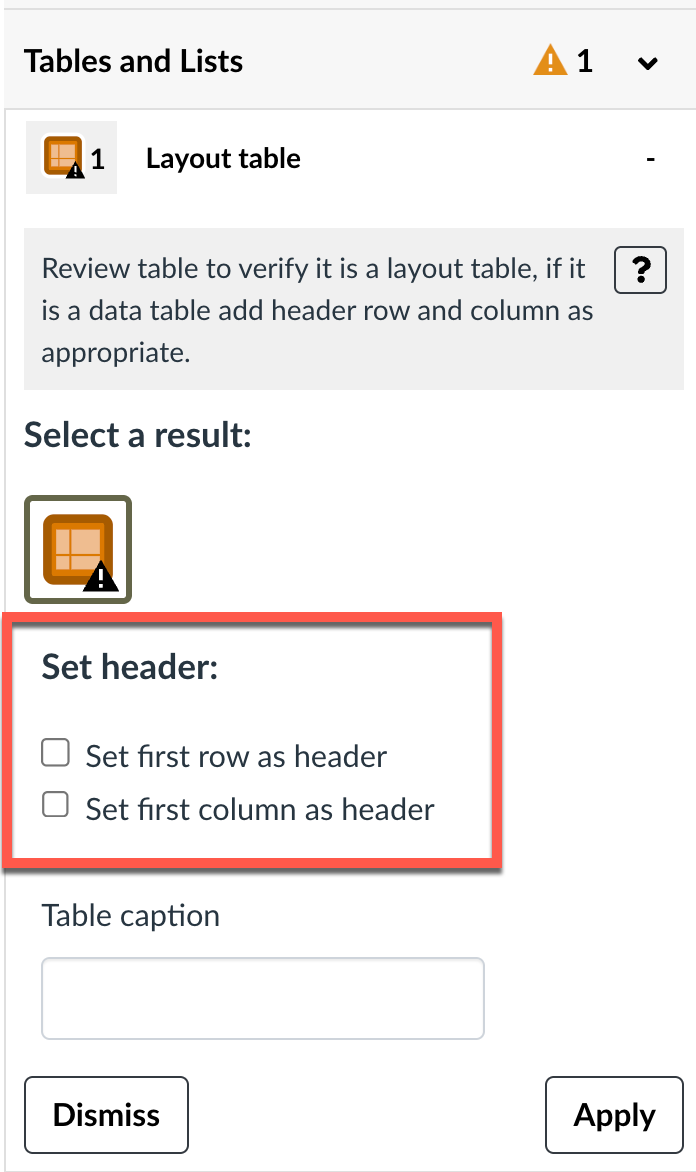
The Pope Tech Fix: The Guide highlights the table visually and provides a simple dropdown or checkbox to "Set Table Header." You can choose "Header Row," "Header Column," or "Both" with one click. Pope Tech will automatically add the appropriate scope for column or row.
Take the 1-Minute Challenge
How many tables are you currently using to organize data in your course? Is there one that might benefit from a quick "Pope Tech tune-up"? Open a page in Canvas that contains a rubric or a schedule and launch the Pope Tech Canvas Guide. Click on the Tables group. If you see a red or orange alert, use the Guide’s "Fix" panel to add a caption or verify your headers. It’s the fastest way to ensure your data is accessible to every student.
Next Month: We’ll continue our Pope Tech series by tackling "Suspicious Link Text" and how to write descriptive links!