Accessibility Tip of the Month 2025
2025 Accessibility Tip of the Month Articles
Each month, we share practical strategies and insights to help educators design more inclusive, accessible learning experiences. Tips are grounded in digital accessibility principles and provide actionable guidance on making your online course accessible. Explore the 2025 monthly tip articles below to discover new ways to support all learners!
Microsoft’s New Accessibility Assistant
By Lori Lane
People work daily with standard documents like Word, PowerPoint, and Excel and may have overlooked the relatively new Microsoft Office Accessibility Assistant, which replaced the Accessibility Checker in March 2023 on Windows and Mac. The Accessibility Assistant is currently available only to Microsoft 365 subscribers. For users with older standalone versions of Office (e.g., 2019 or 2021), the Accessibility Checker is still available, but it lacks the enhanced, real-time capabilities of the Accessibility Assistant.
How to Access the New Assistant
This new tool offers enhanced features, such as improved guidance on accessibility issues and real-time recommendations as users create content, making it easier to address accessibility concerns during document creation rather than afterward. There are two ways to display the tool in real time during editing or writing. Figure 1 shows the main locations for the Accessibility Assistant in Microsoft Word, PowerPoint, or Excel on your PC or Mac. There are two ways to access the Accessibility Assistant:
- Ribbon at the top: Activate the Review tab and go to the Check Accessibility button.
- Status bar at the bottom: Activate the Accessibility feature.

The Accessibility Assistant pane appears after the button is activated in the Ribbon or Status bar. This tool spiders through your document, flags errors like color contrast, images, or tables, and displays issues in different categories. Activating the issue will open a panel with solutions (options) within the pane. As of this writing, the missing headings have not been detected by the Accessibility Assistant. It is still essential to use this tool to spot any real-time errors; regardless, the headings are still required for logically structuring the document.
Spotting Accessibility Issues with On-Canvas Notifications
Another cool on-canvas (on-screen) checking functionality is called on-canvas notifications, an "extension" or "arm" of the Accessibility Assistant that flags accessibility errors or warnings directly on the page or document itself ("on-canvas"). This functionality will call out the issue, and the universal access icon button (resembling a person with outstretched arms and legs) will appear next to the issue on the screen. As shown in Figure 2 below, the universal access icon with a light blue background appears on the top left next to the image. The light blue background appears when you hover over and activate it, and it will stay on during the editing process. Another icon button without the light blue background appears on the bottom and functions as a close button. After editing the alt text, close the icon button on the bottom.
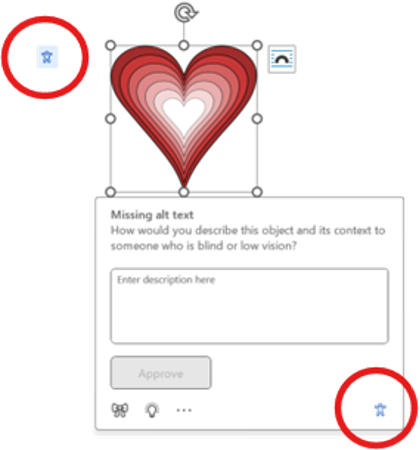
Currently, on-canvas notifications only call out the image's alt text and color contrast. There is no on-canvas notification for table errors; these errors only appear in the Accessibility Assistant pane.
Enabling On-Canvas Notifications
Before you jump with enthusiasm to test it out, there is one more step you need to set it up first. The on-canvas notifications function is not enabled in the settings and will not display on the screen. Do this step:
- On PC: Go to File > More… > Options > Accessibility
You will land on “Make Word more accessible.” Under “Make your document accessible to others,” go to the check box and select “Show me options for creating accessible documents (Preview).” - On Mac: See Word > Preferences > Accessibility
Go to the check box and select “Show me options for creating accessible documents (Preview).”
Current Tools and Campus Support
All in all, the Accessibility Assistant still helps and offers tips or suggestions to fix the issues. However, it cannot detect or identify all mistakes due to shortcomings (e.g., missing headings or table errors). It is a big step toward authoring accessibly in real-time, but hopefully, the tool will improve over time. The good news is that CITL and our campus Title II Training and Education Implementation Team offer quick accessibility guides, resources, and training on our website so our faculty can learn how to create accessible content and use the Accessibility Assistant tool.
The best place to start is the Document Accessibility Guides; take your time to read and learn what you can do to provide accessible materials for your courses. While on the site, Make Your Course Accessible, explore other resources on Canvas and Multimedia Accessibility, Pope Tech Accessibility tool for Canvas, and nearly a dozen hands-on accessibility training opportunities.
If you want to enhance the accessibility and inclusivity of your course and teaching, CITL's Universal Design for Learning (UDL) Team can help. For more information, contact the UDL Team at CITL-UDLTeam@illinois.edu.
Reference: https://commons.wikimedia.org/wiki/File:Editor_at_large_1206.svg
 Introducing the Pope Tech Accessibility Guide and Dashboard
By Marc Thompson (CITL)
This month marks the first in a series of Accessibility Tips of the Month focused on using the Pope Tech Canvas accessibility tools.
Pope Tech provides two accessibility tools to help with Canvas course accessibility. An accessibility checker that simplifies solving basic accessibility issues and a dashboard that tracks accessibility metrics across an instructor’s individual course or courses. In short, the Accessibility Guide simplifies addressing common high-impact accessibility issues and the Accessibility Dashboard allows you to see how much progress you’ve made on making your courses accessible. Note: While the Guide is a useful tool for addressing many of the most frequent accessibility issues, it is not a substitute for knowing the basics of digital accessibility.
Where can you use the Accessibility Guide?
The Accessibility Guide can be used wherever the Rich Content Editor appears in Canvas. This content includes:
- Pages
- Announcements
- Discussions
- Syllabus
- Classic Quizzes (Instructions field)
- Assignments (Instruction field)
To access the Accessibility Guide, go the element you want to check, click on Edit to open the Rich Content Editor, and then scroll down to the bottom right of the page and click on the Pope Tech icon which is located to the left of the save icon (see Figure 1).

When activated the accessibility issues panel appears (see Figure 2).
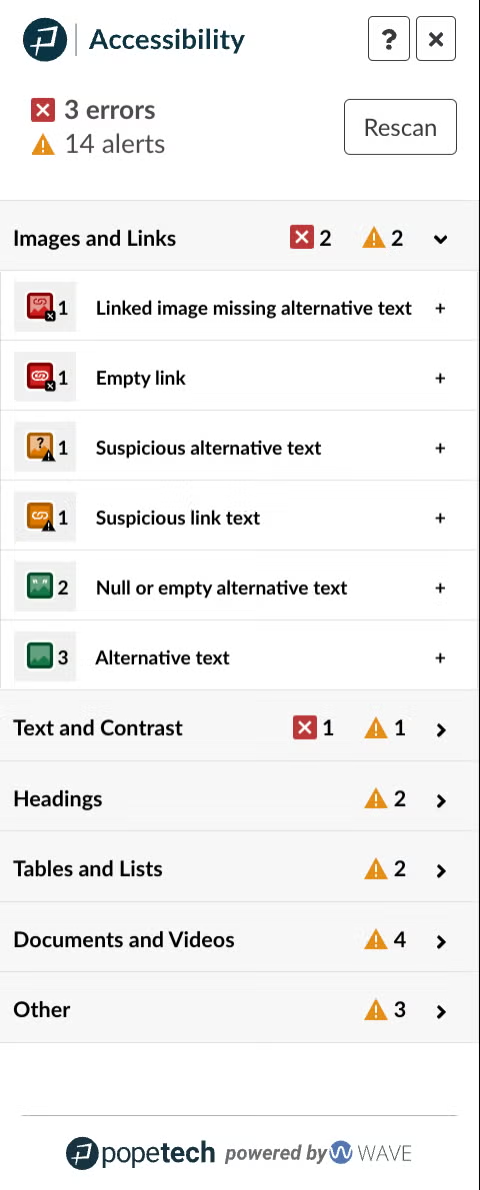
Figure 2: Pope Tech Accessibility Issues Panel
Spot and Fix Issues Right Inside Canvas
Issues on the page are split up into six categories to make them easily navigable. You’ll notice that the categories listed parallel the main content issues covered on this website. As you select each issue, it highlights the alert or error and gives you the tools to address the issue. To learn more about an error or alert (what it means, why it’s important to fix, and how to fix it) click on the question mark icon next to the issue.
What types of issues does the Accessibility Guide check for?
The Accessibility Guide and Dashboard scan for over 20 different types of accessibility issues, including:
- Heading structure problems, such as skipped heading levels
- Image issues, including missing or inadequate alternative (alt) text
- Contrast issues, where text or other elements do not have sufficient contrast against their background
- Link problems, such as empty links or descriptive link text that is unclear
- Table issues, such as missing headers or captions
- Document structure issues, including long paragraphs or misuse of formatting
Pope Tech makes it easy to prioritize your work. The issues it identifies fall into three categories:
- Errors: These are accessibility barriers that should always be addressed.
- Alerts: These indicate potential issues that you should check manually.
- Features: These are accessible elements that Pope Tech recognizes and confirms.
Not only does Pope Tech point out problems, it also helps you fix them. For many issues, it provides an explanation and a built-in tool to correct the problem right within Canvas.
Access and Navigate the Canvas Accessibility Guide
Direct link to video: Access and Navigate the Canvas Accessibility Guide (2:21 mins.)
Take It Up a Level: The Course Accessibility Dashboard
In addition to checking Canvas page content, instructors also have access to the Pope Tech Course Accessibility Dashboard, located in the navigation menu of your Canvas course. The Dashboard provides an at-a-glance overview of accessibility issues across your entire course — scanning pages, assignments, discussions, quizzes, and syllabi. You can drill down into specific issues and individual content items, helping you prioritize your time and efforts. It’s an excellent tool to use periodically to track your accessibility progress in your course or courses as you make improvements over time.
The Accessibility Dashboard is found by clicking on Pope Tech Accessibility in your Canvas course menu (your button might be further down in the navigation list).
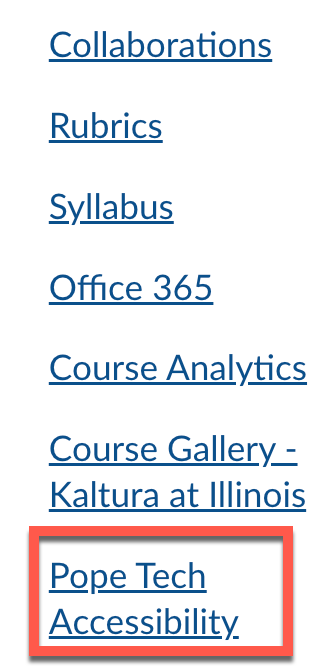
Figure 3: Course Navigation Menu
How to Use the Dashboard to Prioritize Your Work
The Accessibility Dashboard provides you a full report of the errors and alerts it finds in your entire Canvas site helping you prioritize the pages with the greatest number of elements that need to be addressed. Figure 4 shows the scan of a course titled Utah Jazz History. As you can see, the course has 16 errors and 39 alerts that need to be checked. The most common issues are highlighted in the graph in the central region of the dashboard.
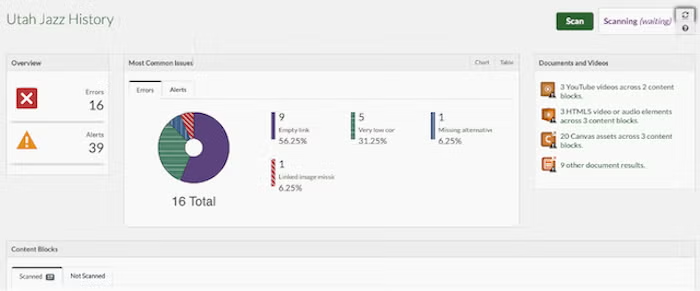
Figure 4: Pope Tech Accessibility Dashboard
The Dashboard provides course wide metrics as well as allowing you to see the number of errors or alerts found on each page. As you scroll down, the dashboard lists the individual pages that it found errors on. The detail button in this list provides a full breakdown of the types of errors and alerts on the page, and the edit button opens both that page and the accessibility guide so that these issues can be fixed immediately.
Get Started Using Pope Tech's Canvas Course Dashboard
Direct link to video: Get Started Using Pope Tech's Canvas Course Dashboard (3:03 mins.)
What’s Coming Next? More Tips for Using Pope Tech
This month’s tip is simply an introduction to what Pope Tech can do for you and your students. In the months to come, we’ll explore the specifics of how to use the tool to fix issues like heading and table structure, contrast issues, missing alternative text descriptions for images, and more. Stay tuned for practical hands-on advice to help you make your Canvas courses more inclusive and accessible. Next month, we’ll take a closer look at using Pope Tech to check and improve your heading structure—one of the most important steps in making content more accessible to all students!
In the meantime, you can use the Make Your Course Accessible website to learn more about the Pope Tech Guide and Dashboard, or reach out to CITL's Universal Design for Learning (UDL) Team at CITL-UDLTeam@illinois.edu for personalized support.
Pope Tech Canvas Guide Series: Working with Alt Text and Images
By Marc Thompson (CITL)
This month’s Accessibility Tip of the Month focuses on one of the most important accessibility issues the Pope Tech Canvas Accessibility Checker looks for: alternative (or “alt”) text for images. If ever there was a “poster child” for accessibility, it would have to be alt text. So, what exactly is alt text?
Alt text is essentially text description for non-text content. Alt text is written for informative images, rather than decorative images (such as decorative borders, for instance). For most content created in Canvas pages, informative non-text content consists of graphics, photos, graphs, charts, and the like.
Why Do We Need Alt Text?
Alt text is mostly used by people who are blind or have low vision and either cannot see the image or cannot see it well enough to understand it. In such cases, alt text is readable by assistive technologies that read the alt text aloud, such as screen readers, or convert it to Braille (as with Braille keyboards). Additionally, if the link to an image is broken and the image does not appear, the alt text description will become visible to all users. Some people with cognitive disabilities turn off images to reduce distractions, leaving alt text in its place. Finally, people in countries with slow internet may rely on alt text because they sometimes turn off images to conserve bandwidth and load pages faster.
Writing Effective Alt Text
Writing effective alt text requires careful thinking about the context and purpose of images. Because alt text is normally not shown to most learners without the use of assistive technologies, it is crucial that the main text related to the image (not the alt text) establishes the image’s context and purpose. In this way, the alt text then conveys only what’s needed to draw the connection between the image and what’s conveyed about it in the main text.
It follows that alt text should be as concise as possible. Although the Pope Tech Accessibility Checker will flag any alt text that exceeds 120 characters, there’s no hard and fast rule on a specific maximum number of characters alt text should contain. What’s most important is that alt text should be concise. The Pope Tech Accessibility Checker can’t determine if an image is informative or decorative, but it will give you an option to mark the image as decorative or provide alternative text description. If you don’t add alt text for the image, Canvas will automatically insert the image filename (e.g., image-name.jpg) as alternative text, and the checker will then flag filenames used as alt text.
Tips for Writing Effective Alt Text
- Be concise and specific: Describe what the image shows, not what it is (e.g., "A bar chart showing enrollment trends").
- Avoid repeating nearby text: Don’t restate what’s already clearly written in the content
- Skip phrases like "Image of" or "Picture of": screen readers detect images and will already indicate that an image is an image.
- Mark as decorative only when the image adds no meaningful content.
What Image-related Issues Does Pope Tech Check For?
The Pope Tech Accessibility Guide in Canvas detects the following common image-related accessibility issues and provides tools to help instructors resolve them directly within the Canvas editor:
1. Missing Alternative Text
- What it checks: Whether an image is missing alt text.
- Why it matters: Screen readers rely on alt text to describe images to users who are blind or visually impaired.
- How to fix: Add a short, meaningful description, or mark the image as decorative if it doesn’t convey essential content.
2. Suspicious Alternative Text
- What it checks: Whether the alt text seems auto-generated or unhelpful (e.g., a file name like
image1.jpg). - Why it matters: Non-descriptive alt text fails to convey meaningful information and can confuse screen reader users.
- How to fix: Replace with a meaningful description that reflects the content or purpose of the image.
3. Decorative Images Not Marked Correctly
- What it checks: If an image appears decorative but is not properly marked as such.
- Why it matters: Decorative images should be skipped by screen readers to avoid unnecessary chatter and distraction.
- How to fix: Mark the image as decorative using the checkbox option in Pope Tech.
4. Images with Redundant Alternative Text
- What it checks: Whether the alt text repeats visible text that’s already next to or part of the image.
- Why it matters: Redundant alt text doesn’t improve accessibility and can be irritating or confusing for screen reader users.
- How to fix: Edit the alt text to provide new or supplemental information, or remove it if it is unnecessary.
5. Linked Images Missing Alt Text
- What it checks: Whether an image that is also a link lacks descriptive alt text.
- Why it matters: Screen reader users need alt text that explains where the link will take them.
- How to fix: Add alt text that clearly describes the link’s destination or function (e.g., "Visit the Library Homepage").
These checks help ensure that images in Canvas are meaningful, accessible, and usable for all students, including those using assistive technologies.
Using the Pope Tech Accessibility Checker to Fix Alt Text
Step 1: Open the Canvas Page containing the Image
- Go to your Canvas course.
- Navigate to the page, discussion, assignment, etc., that contains the image you want to fix.
- Click “Edit” to open the content editor.

Step 2: Launch the Pope Tech Accessibility Guide
In the Rich Content Editor toolbar, click the Pope Tech accessibility icon (a small gauge/meter icon, usually near the right side of the toolbar).

Step 3: Review Detected Issues
- The Pope Tech Accessibility Guide will slide out from the right-hand side of the screen.
- Issues will be categorized (e.g., Images, Headings, Tables, etc.).
- Click on the “Images” category to expand it if it isn’t already open.
Step 4: Select the Image That Needs Alt Text
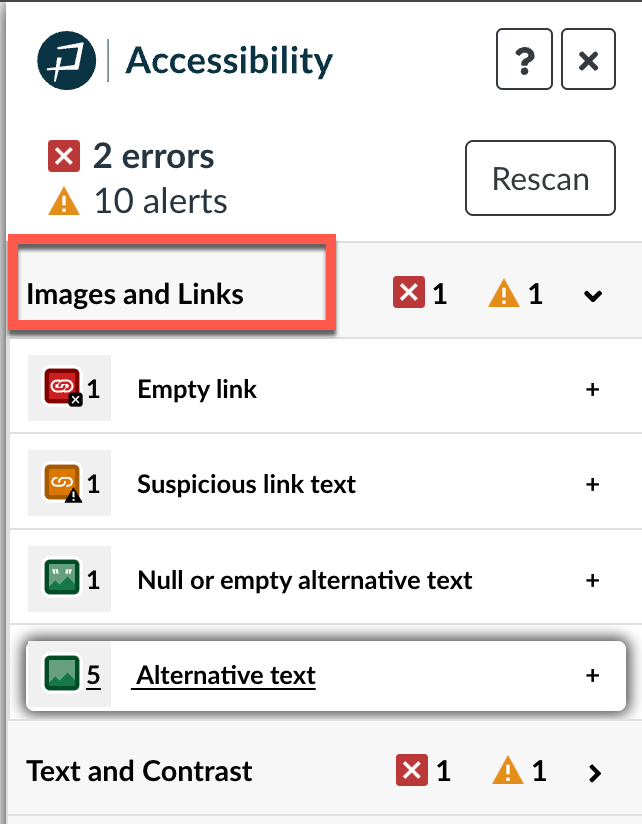
- Pope Tech will display a list of all images with missing or problematic alternative text.
- Click the thumbnail of the image or the arrow next to it to begin editing.
Step 5: Add Alt Text or Mark as Decorative
You now have two choices:
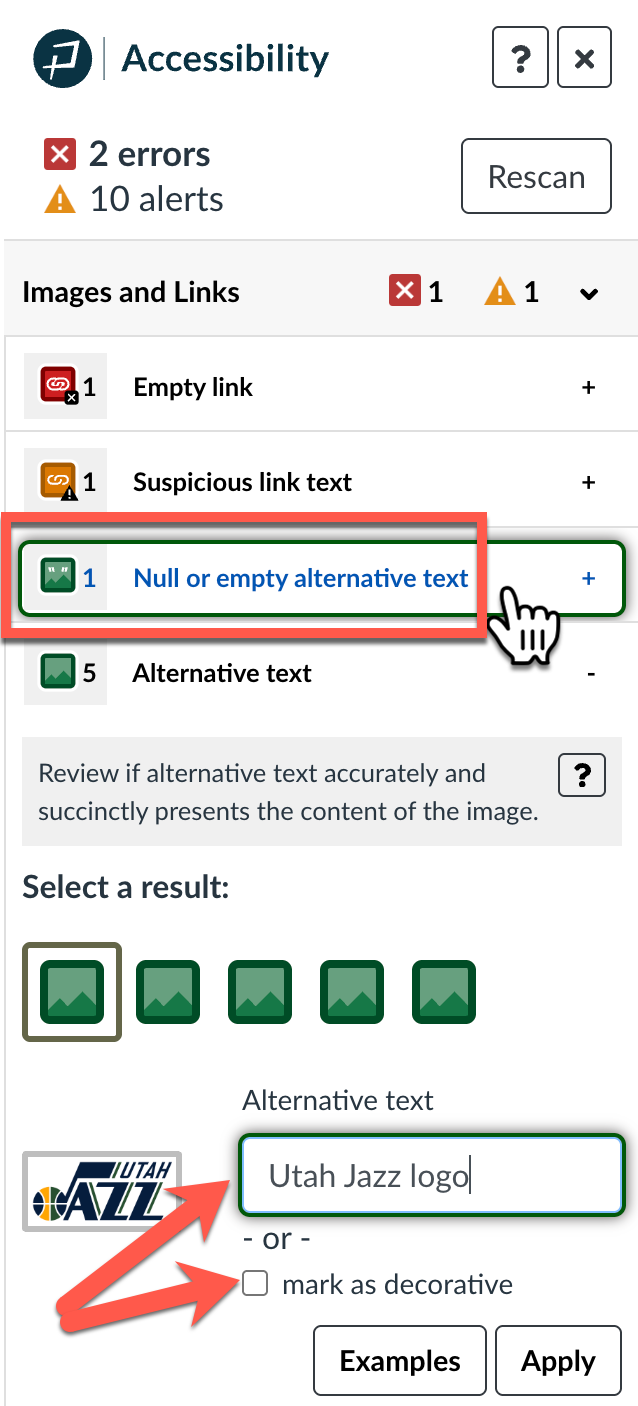
Option A: Add Alternative Text
- In the “Alt Text” field that appears, type a short, meaningful description of the image (typically 1–2 sentences or less).
- Click “Apply” to save the alt text.
Option B: Mark as Decorative
- If the image is purely decorative (e.g., borders, icons that repeat info already in text), check the box labeled “Decorative Image”.
- Click “Apply” to confirm.

Step 6: Save the Page
After you finish reviewing and fixing issues, click “Save” (or “Save & Publish”) at the bottom of the Canvas page.

Tune in next month when we explore how to use headings to organize the information on your pages in Canvas and make them more understandable and navigable to all learners, including learners who may be using assistive technology like screen readers.
Contact Information
If you’re looking to enhance the accessibility and inclusivity of your course design, CITL's Universal Design for Learning (UDL) Team is here to help! You can reach us at CITL-UDLTeam@illinois.edu.
Pope Tech Canvas Guide Series: Working with Headings
By Marc Thompson (CITL)
Where are you heading? It's a question we often ask ourselves, especially when we're trying to figure out where w're going. It's also a question that's especially important for students trying to understand and navigate their Canvas course content. And that's precisely why this month's Accessibility Tip of the Month focuses on using headings to organize content in Canvas and provide navigational support for all learners. Along the way, we’ll explain how to use Pope Tech's accessibility tool, the Canvas Accessibility Guide, to help you check if your headings have been correctly applied.
What Are Headings?
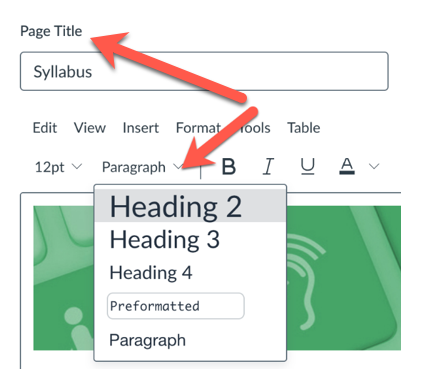
If you've ever created a topic outline, you already understand how headings work. There are six heading levels, with Heading 1 always serving as the page title. When you create a new page in Canvas, whatever you name the page is automatically formatted as a Heading 1. Heading 2 is used for main topics on the page, Heading 3 for subtopics, and so on.
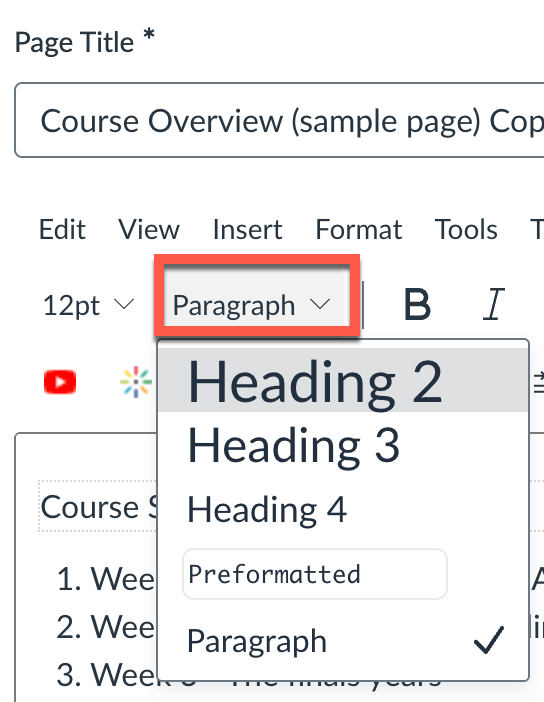
As you build the rest of your page, you can format the main sections and subsections of your content by using the font format dropdown in the Canvas rich content editor (see Figure 1). Simply select the text you want to be a heading and choose the appropriate heading level. Once a heading level is applied, you can change its font size or color without affecting the heading's structure. You're not bound by the default heading sizes or colors.
Headings and Accessibility
Beyond simply organizing content, headings are a powerful navigation tool for all users. Think of them as signposts for your students. For someone using a screen reader, headings act as a kind of table of contents for the page, allowing the user to jump from one heading to the next with a single keystroke. Without headings, a screen reader user would have to listen to the entire page, word for word, to locate the information they need.
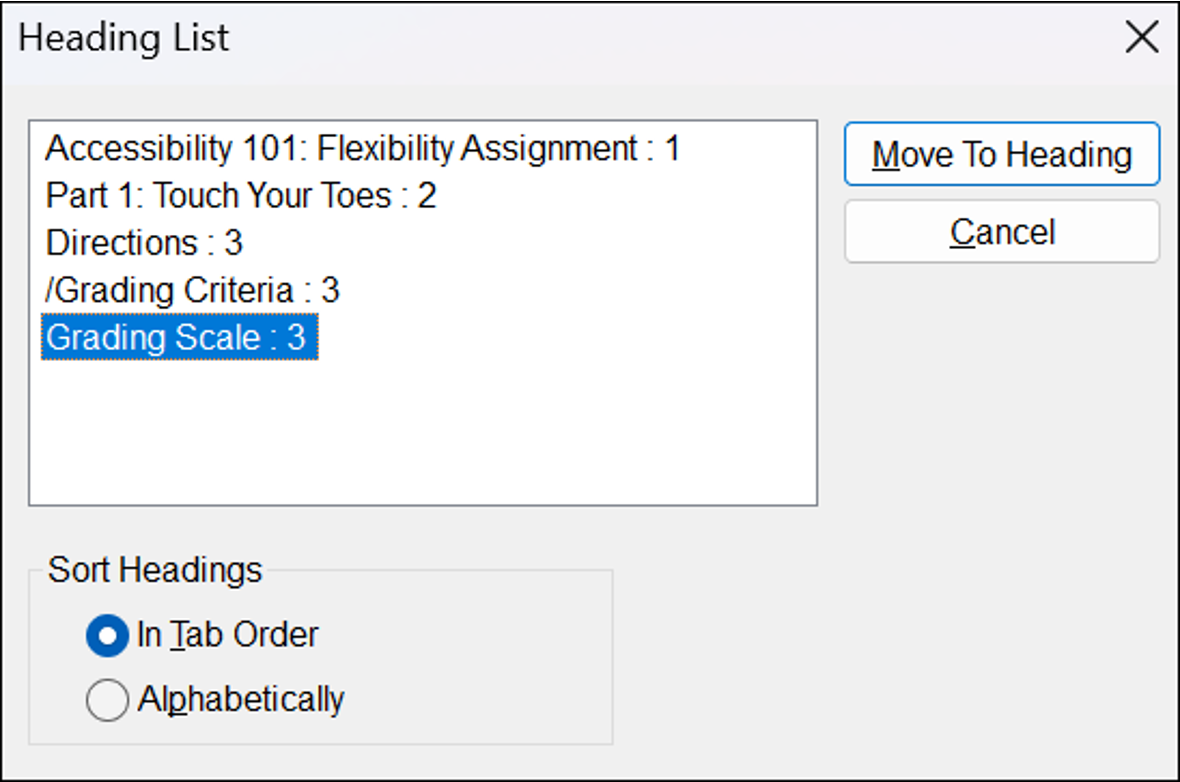
Whereas most sighted users quickly skim a page, looking at the size of the text and the spatial relationships as visual clues, screen reader users will quickly "skim" the heading structure to get a sense of the content and how it's organized. In fact, according to WebAIM’s 2024 screen reader user survey, shows that 71.6% of the 1,511 respondents use headings to navigate pages (see WebAIM's Screen Reader User Survey). To give you an idea of what screen readers see when they look at headings, Figure 2 shows a list headings a screen reader user might pull up in JAWS, a popular Windows-based screen reader. The number to the right of the headings in the list indicates the heading level. Note also the "Move to Heading" button used to facilitate navigation. Put plainly, organizing content with headings makes it easier for everyone to find what they're looking for by breaking up long blocks of text into manageable chunks. When headings are correctly applied, both sighted users and screen reader users can quickly see the relationships between different sections of content and more easily locate the information they need.
Using the Pope Tech Canvas Guide to Fix Heading Issues
Now that you understand how headings provide clear structure for your content, you can use the Pope Tech Accessibility Guide to check if headings have been properly applied to your page content. When you click the Pope Tech Accessibility Guide button next to the Save and Cancel buttons at the bottom of the Canvas editor (see Figure 3), the Guide will scan your page and report any accessibility issues it finds. If there are issues with your headings, they will be flagged.

Top 3 Heading Issues and How to Fix Them
We'll focus on the three main heading issues reported by the Pope Tech Accessibility Guide and how to fix them.
1. Empty Headings
Keyboard and screen reader users often navigate by headings. Empty headings (headings with no content) present no information to the user and can cause confusion. The Pope Tech Accessibility Guide identifies Empty Headings as errors.
To fix an empty heading, you can either add the missing heading text or remove the heading entirely (see Figure 4).
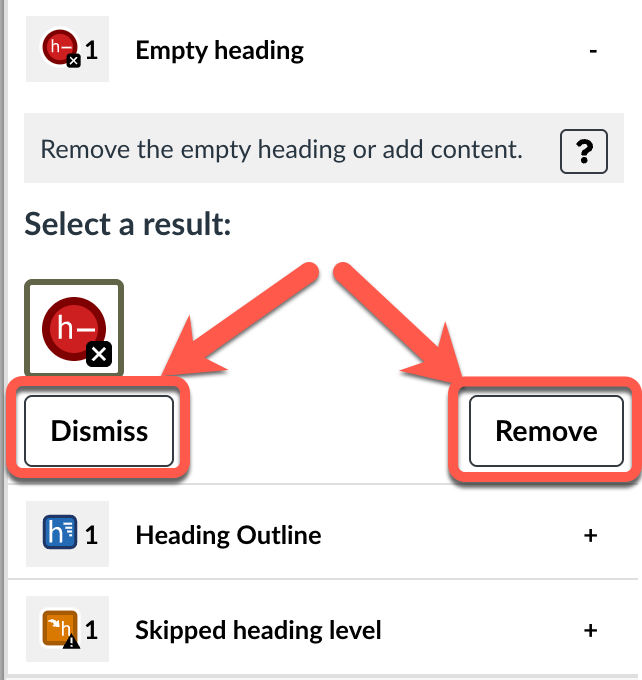
To locate the empty heading itself in the Canvas editor, select the Empty Heading error in the results list. This will highlight the issue in the editor, as shown in Figure 5.

2. Skipped Heading Levels
Headings provide a clear document structure. When heading levels are skipped (e.g., going from a Heading 2 to a Heading 4), users who rely on assistive technology may have trouble navigating. The Pope Tech Accessibility Guide identifies Skipped Heading Levels as alerts.
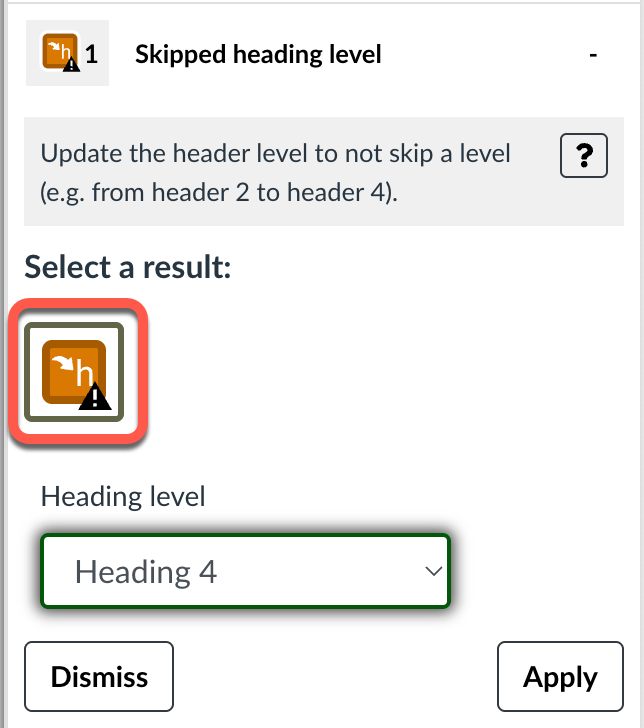
To fix this issue, you can locate the skipped heading by selecting the Skipped Heading icon in the Pope Tech results list (see Figure 6). This will highlight the heading in the Canvas Editor.
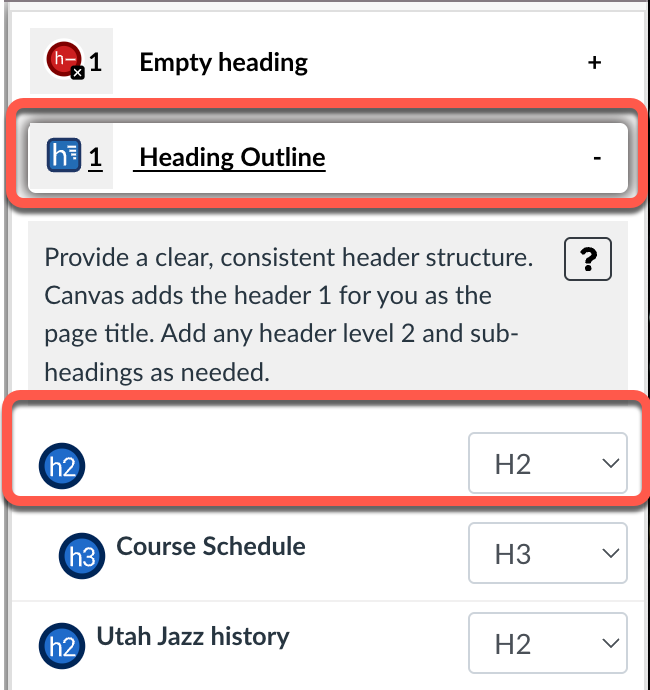
You can then use the Heading Outline tool to see the heading outline for the entire page with the skipped heading highlighted. The tool provides a convenient dropdown list you can use to change the heading to the correct level (see Figure 7).
3. No Heading Structure
Headings provide important document structure and navigation functionality for all users. When there are no headings on a page, it can be difficult for anyone to quickly understand the content and navigate through it.
To fix this issue, you need to add or mark text as a heading using the Canvas editor formatting options (see Figure 8). Remember to use the topic outline framework as your guide: the page title is always Heading 1, main topics are Heading 2, subtopics are Heading 3, and so on.
In short, using the Pope Tech Accessibility Guide can help you quickly and efficiently ensure that your Canvas page content is well-structured and accessible to all students. Regularly checking your pages with the Pope Tech tool and fixing any heading issues not only improves accessibility but also helps organize your content and make it easier to read and navigate for everyone.
So, where are your students heading? With a little effort and guidance from the Pope Tech tool, you can make sure they’re always on the right path.
Tune in next month when we explore color contrast in Canvas and how to use the Pope Tech Guide to identify and fix contrast issues making your content more accessible to all learners, especially those with low vision or color blindness.
Contact Information
If you’re looking to enhance the accessibility and inclusivity of your course design, CITL's Universal Design for Learning (UDL) Team is here to help! You can reach us at CITL-UDLTeam@illinois.edu.